Showing posts with label breakfast. Show all posts

Thursday, May 22, 2014

Baked Oatmeal

Baked Oatmeal

I've been making this baked oatmeal for breakfast for a couple of months now, so I apologize for not sharing it earlier! I got this amazing recipe from my mom who found it in this cookbook. I had seen baked oatmeal recipes before but didn't give them much thought because I'm perfectly happy with my regular oatmeal + coconut butter + frozen blueberries. I'm so happy I got a chance to try this when my mom made it because it let me see the beauty of baked oatmeal! 

Baked Oatmeal | katesfoodfortheweek.blogspot.com

If you've never had baked oatmeal before it does have a slightly different texture compared to regular oatmeal. But it is also very delicious and this recipe is surprisingly healthy (take a look at the ingredients!). Mark has been loving this and right now definitely prefers it over regular oatmeal. A bonus is that you can throw this together on the weekend and  then you've got quick breakfasts to reheat throughout the week. 

This is the sort of recipe you could definitely modify by substituting different ingredients for those listed in the original recipe. I haven't messed with it much because we both love it as is! 

Baked Oatmeal | katesfoodfortheweek.blogspot.com


Baked Oatmeal

serves: 8-10 (can also be halved and baked in an 8x8 square baking dish to serve 4-5)

INGREDIENTS:
  • 5 cups rolled oats (for gluten-free make sure the oats are certified gluten-free)
  • 3/4 cup raisins
  • 3/4 cup walnuts, chopped
  • 2 apples, cored and grated (I grated them on a cheese grater and the peels came off in the process)
  • 1 tablespoon baking powder
  • 1 teaspoon ground cinnamon
  • 1/8 teaspoon salt
  • 1 teaspoon pure vanilla extract
  • 2 1/2 cups almond milk (or milk of choice)
  • 4 large eggs, beaten
  • 1/4 cup honey
  • For Serving:  Mark likes his topped with some maple syrup and honey yogurt. I like it plain or with frozen blueberries and almond milk. Get creative! 
DIRECTIONS:
  1. In a large bowl, mix together the oats, raisins, walnuts, grated apples, baking powder, cinnamon, and salt. Make sure the apples are distributed evenly throughout.
  2. In a separate bowl, whisk together the vanilla, almond milk, eggs, and honey. Do your best to incorporate the honey.
  3. Pour the wet ingredients over the dry ingredients and mix well to combine.
  4. Transfer the mixture to an ungreased 9x13 baking pan. Cover with aluminum foil and put in the refrigerator.*
  5. Take the oatmeal out of the refrigerator. Preheat the oven to 350F. Once preheated, bake the oatmeal for 30 to 40 minutes until lightly golden on top. Be careful not to over-bake or it will dry out.
  6. Cut into slices and serve in bowls with toppings of choice.
  7. Refrigerate leftovers for up to 5 days. 
*At this point you can leave the unbaked oatmeal in the refrigerator over night if desired. This makes for a delicious breakfast in the morning. If you don't want to wait until morning, I've always let it sit in the refrigerator for at least 3 hours before baking. I'm sure you could bake it immediately and it would turn out great, though perhaps not exactly the same texture.

recipe slightly adapted from Sleep on It

Wednesday, March 12, 2014

Yogurt with Nut Butter


Yogurt with Nut Butter

I have a new lunch obsession.  The title really says it all.  Yogurt with nut butter.  Sound weird?  I thought it did at first too.  But then I remembered how much I like peanut butter on everything else.  I've put peanut on ice cream/frozen yogurt and in smoothies, so why not just directly on to plain yogurt?  Silly me for never having thought of this before.  This post on the kitchn was my inspiration.  Though I haven't tried the graham crackers like they did, I do think the crunch would be nice. 

Yogurt with Nut Butter

I've been having this along with some cut up veggies for lunch for the past couple of weeks.  The peanut butter makes it taste rich and amazing.  The great thing is that it is VERY filling, but also very nutritious.  It has lots of protein and healthy fats, but not too many carbs. It is quick to prepare and easy to take on the go in a little container.  

Try it!  Especially if you are in need of new lunch ideas.

I should mention that when I first told Mark about yogurt with peanut butter on it I think he was skeptical, but he did try it and has since had it multiple times as a lunch addition/snack.  He's not one to have yogurt plain, but throw some peanut butter on it and he's a big fan. :)

Yogurt with Nut Butter


Yogurt with Nut Butter
Here is my "formula"- play around with it!  

Yogurt with Nut ButterINGREDIENTS:
  • 1 cup plain nonfat greek yogurt 
  • 1-2 tablespoons nut butter (peanut butter or almond butter-- peanut butter will have a stronger flavor)
  • drizzle of honey or small spoonful of jam

DIRECTIONS:
1) Put all the ingredients in a bowl and stir to combine.
2) Eat!

Or... if you want to make it look fancy, you can microwave the peanut butter in a small dish first for about 1 minute to make it easier to pour.  That's what I did for the first photo.  But usually, I just stir everything together in the bowl or container I eat it out of.


Tuesday, June 25, 2013

Whole Wheat Scones with Raisins and Walnuts

Whole Wheat Scones with Raisins and Walnuts

When I used to think of scones I would think of dry, crumbly, sweet breakfast treats.  They weren't my favorite thing... I guess I tend to prefer baked goods that are more chewy?  In any case, a couple of weeks ago I came across this recipe on the King Arthur Flour site and decided to give these scones a shot.  I was a huge fan!  A number of other people tried them and liked them as well.  

I should mention that these aren't quite like traditional scones.  They are only lightly sweetened, and have a strong wheat flavor (that I really liked!).  They are loaded with walnuts and raisins, which provide extra sweetness and texture.  You'll notice that there is a bit of orange juice in these.  This does not affect the flavor, and actually helps to counteract any bitterness from the whole wheat flour.

I've made these two times within a week and a half, so I suppose that says a lot!  Each time I prepared the scones the night before and baked them in the morning.  Easy and delicious!

Whole Wheat Scones with Raisins and Walnuts

Whole Wheat Scones with Raisins and Walnuts

yield:  12 medium scones

INGREDIENTS:

  • 2 1/4 cups white whole wheat flour
  • 2 teaspoons baking powder
  • 1/2 teaspoon baking soda
  • 1/2 teaspoon salt
  • 1/4 cup brown sugar
  • 1 1/2 cups raisins
  • 2/3 cups diced walnuts
  • 1/3 cup butter (cold, cut into small chunks)
  • 2 tablespoons cold orange juice
  • 1/3 cup cold milk (I used 2%)
  • 1 1/2 teaspoons vanilla extract
  • 2 large eggs

DIRECTIONS:

1)  Combine flour, baking powder, baking soda, salt, and sugar in the bowl of a food processor.  Add butter and pulse about 10 times, until you have a crumbly mixture.  Dump into a medium sized bowl.    Add raisins and walnuts and stir to combine.  If any large chunks of butter remain, flatten them with your fingers.

2)  In a small bowl, whisk together orange juice, milk, vanilla extract, and eggs.  Pour onto dry ingredients and mix just until all flour has been moistened and the dough holds together.

3)  Line a baking sheet with parchment or a silicone baking mat.  Transfer dough to the baking mat and divide in half.  Form each half into a rough circle that is about 3/4 inch tall.  Use a knife or a bench scraper to slice each circle into 6 wedges (be careful not to cut your baking mat!).  Cover the pan with plastic wrap and put in the refrigerator until ready to bake.  (If you want to bake these immediately, put the pan uncovered into the freezer while you preheat the oven as directed in step 4).

4)  When ready to bake, preheat oven to 375F.   Once the oven has preheated, transfer the pan of scones to the oven and bake for 20-30 minutes, until starting to brown on top.  Remove from the oven and let sit for a few minutes.  Then, serve warm.   These are delicious plain, but you could also serve them with butter/jam/etc.

(recipe adapted from King Arthur Flour)

Saturday, April 20, 2013

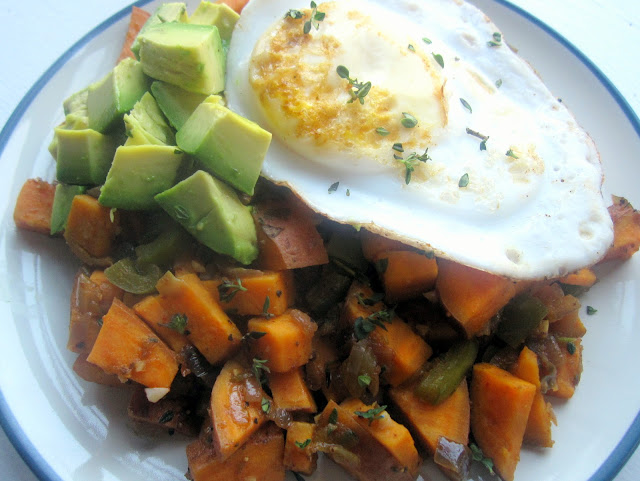
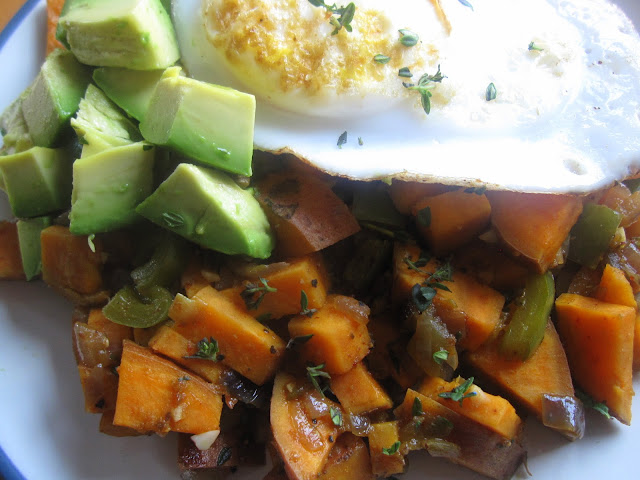
Chile Sweet Potato Hash with Eggs and Avocado

Chile Sweet Potato Hash with Eggs and Avocado

I don't know if you've noticed, but I've really come to like sweet potatoes lately!  And as much as I'm still obsessed with baked sweet potato fries, I'm always on the lookout for another way to serve them.  This sweet potato hash is a great breakfast/brunch idea, or when you are in the mood for breakfast for dinner!

This hash consists of red onion, green bell pepper, sweet potatoes, and fire roasted chiles.  The avocado and fried egg on top really pulls it all together.  This is a satisfying meal full of vitamins and healthy fats.  We were lucky enough to have ours with fresh duck eggs, thanks to our neighbors.  Gotta love country life!

Chile Sweet Potato Hash with Eggs and Avocado

Chile Sweet Potato Hash with Eggs and Avocado

Serves: 3-4 (depending on what meal you have this for, how hungry you are, and whether or not you have anything else along side)

INGREDIENTS:
  • 2 tablespoons olive oil
  • 1 red onion, cut into small dice
  • salt + pepper
  • chipotle chili powder (optional)
  • 1 green bell pepper, cut into small dice
  • 1 to 1 1/2 pounds sweet potatoes, scrubbed clean and cut into small dice
  • 5 cloves garlic, minced
  • 1 can (4 ounces) diced fire roasted diced green chile
  • 3/4 cup vegetable broth (or water, though vegetable broth adds more flavor)
  • 1 teaspoon fresh thyme leaves (optional)
  • eggs: 1 per person
  • 1 avocado, diced

DIRECTIONS:

1)  Heat the oil in a large skillet over medium-high heat (I used a cast-iron skillet).  Once hot and shimmering, add the onion.  Season with a bit of salt and pepper (not too much, you can add more later), and chipotle chili powder as desired.  Cook until soft, stirring occasionally, for about three minutes.

2)  Add green bell pepper and continue to cook until soft, stirring occasionally,  about 5 minutes.

3)  Add sweet potatoes and stir well to combine.  Cook and stir for about 3 minutes until the sweet potatoes just start to brown.  Add garlic and diced green chile and cook for about one more minute, until fragrant.

4)  Add vegetable broth and stir to combine.  Cover and let cook until the potatoes are fork tender, about 5 minutes.

5)  While the potatoes are cooking, start cooking the eggs.  Heat a small non-stick skillet over medium heat. Crack an egg into the pan and cover the pan.  Let cook for a couple minutes and then check on it.  Flip over if desired to cook the yolk more directly.  Once cooked to desired consistency, repeat with the remaining eggs.

6)  Once the potatoes are fork tender, remove the cover and continue cooking until all of the vegetable broth is absorbed (if it is not already).  Stir in the thyme and season with additional salt, pepper, and chipotle chili powder to taste.  Turn off heat and cover to keep warm until the eggs are done.

7) Serve hash topped with avocado and eggs.  I haven't tried it, but I think this would also be good with a bit of hot sauce if you like that sort of thing!

(recipe adapted from Family Fresh Cooking)

Monday, February 18, 2013

Shakshuka [Eggs in Spicy Tomato Sauce]

Shakshuka

I had never heard of shakshuka until a few days ago when I happened upon a recipe for it.  After searching around a bit I noticed that lots of people have written about it over the years and everyone seemed to love it.  So I was excited to give it a try myself!

If you, like me a few days ago, have never heard of shakshuka, it's a breakfast dish that is popular in many different countries including Israel.  It sounds like a lot of countries claim it was their creation, so the history is a bit fuzzy (though interesting).  In any case, it is delicious!  It's a spicy tomato sauce with whole eggs cooked into it.   I also added kale, chickpeas, and feta cheese.  It is crucial that you serve shakshuka with bread for sopping up the sauce.  We had sourdough bread, but naan, pita, or another hearty bread would be great as well.  We had the shakshuka for dinner, but it would of course be a great savory breakfast- as it was intended!

Shakshuka

This was a pretty quick meal to come together, and very flavorful and satisfying.  It's also fun to see the eggs cooking in the sauce!  We both really liked this meal.  Whether or not you are already a fan of shakshuka, I hope you'll give it a try!

Shakshuka


Shakshuka [Eggs in Spicy Tomato Sauce]

Serves: 4

INGREDIENTS:

  • 3 tablespoons olive oil
  • 3 jalapenos, stemmed, seeded, and finely chopped
  • 1 small yellow onion, chopped
  • 6 large cloves garlic, sliced
  • 1 teaspoon ground cumin
  • 1 tablespoon paprika
  • 1/2 teaspoon ground chipotle chile
  • 1 teaspoon ground black pepper
  • 1/2 teaspoon turmeric
  • 1 28 ounce can whole tomatoes, undrained (no salt added if possible)
  • 1 cup vegetable broth
  • salt to taste
  • 2 teaspoons honey
  • 1 teaspoon apple cider vinegar
  • 1 cup roughly chopped kale
  • 1 cup cooked chickpeas
  • 4 ounces light feta cheese, crumbled or chopped into small cubes
  • 6 eggs
  • sourdough bread, naan, pitas, or other bread for serving


DIRECTIONS:

1)  Heat oil in a dutch oven or large skillet over medium high heat.  Add jalapenos and onions and cook, stirring occasionally, until lightly browned, about 5 minutes.

2)  Add garlic, cumin, paprika, chipotle chile, black pepper and turmeric.  Cook, stirring frequently, until garlic is soft, about 2 minutes.

3)  Add tomatoes (with juice from can), vegetable broth, salt, honey, and apple cider vinegar and stir to combine.  Reduce heat to medium and cook for about 10 minutes.  While cooking, use a wooden spoon to stir and mash up the tomatoes.   As the tomatoes cook, this will become easier to do.  Ultimately small chunks of tomatoes are okay.

3)  Add kale and chickpeas and cook, stirring occasionally, until kale is wilted.  Add feta cheese and stir to combine.

4)  Make 6 small wells in the sauce as best you can.  Carefully crack an egg into each well.  Cover the dutch oven/skillet and cook over medium until eggs are cooked to your liking, about 5-10 minutes.

5) Serve shakshuka with bread and additional feta cheese if desired.  Enjoy!

(recipe adapted from smitten kitchen and david lebovitz)

Monday, December 17, 2012

Honey-Wheat English Muffins


Honey-Wheat English Muffins

Recently I have been having these English muffins almost daily as part of my lunch.  I got the recipe from King Arthur Flour (their website is a gold mine for great baking recipes!) and I adapted it just slightly.  I am probably strange in that I don't prefer these English muffins toasted.  I like them nice and warm and soft slathered with maple cinnamon almond butter.  SO GOOD!!  

There are some weird ingredients and tools required for this recipe.  For ingredients, you can get vital wheat gluten from most grocery stores wherever they have the Bob's Red Mill items.  Probably this will be in the baking aisle and/or organic section.  The Hi-Maize Fiber and non-diastatic malt powder are King Arthur Flour products that I actually buy from them.  I haven't tried it, but you could probably just substitute a bit more flour for the fiber and a bit of sugar for the malt powder if you don't want to buy those items.  The non-diastatic malt powder is a good ingredient to have for making bagels as well.

Honey-Wheat English Muffins

The English muffin rings I also got from King Arthur Flour, but you can probably get them from other kitchen supply stores as well.  If you don't have the rings, you could still make these.  The shape of the muffins would just be more free-form.  Don't let a lack of rings stop you from trying these!

Honey-Wheat English Muffins

Yield:  12 muffins

INGREDIENTS:

Note:  I have provided the weights for most of the ingredients because when I bake I prefer to measure my ingredients by weight in order to get a more accurate result.  If you don't have a good digital scale, use the volume measurements.

  • 1 1/2 cups warm water
  • 1 large egg, lightly beaten
  • 3 tablespoons (2 1/4 ounces) honey  
  • 2 tablespoons (1 ounce)  butter 
  • 2 tablespoons (1/2 ounce) non-diastatic malt powder 
  • 2 cups  (8 ounces) white whole wheat flour
  • 1 cup (4 1/4 ounces) unbleached all-purpose flour 
  • 3/4 cup (3 ounces) rolled oats 
  • 3/4 cup  (3 3/8 ounces) Hi-maize Fiber
  • 1/4 cup (1 ounce) nonfat dry milk powder 
  • 1 tablespoon vital wheat gluten flour
  • 2 teaspoons instant yeast
  • 2 teaspoons baking powder
  • 1  teaspoon salt
  • 1 to 2 tablespoons cornmeal to dust the griddle
DIRECTIONS:

1) Add all of the ingredients except the cornmeal to the bowl of your mixer. Beat with the paddle attachment until the dough is glossy, about 6 minutes.
2) Cover the bowl, and let dough rise at warm room temperature until doubled in size, about 80-90 minutes.
3) Preheat both the oven and a griddle or heavy skillet to 350°F (medium high heat). Place 6 rings on the griddle evenly over the heat sources and grease the rings and griddle with cooking spray. Sprinkle a little cornmeal into the center of each ring.
4) Wet your fingers to help prevent sticking and scoop 3 ounces of dough (about 1/3 cup of dough) into each ring to make the first 6 muffins. Spread the dough to the edge of the ring.  Sprinkle the tops with more cornmeal.  Note:  If you don't have rings, form the dough into a rough circle before placing it on the griddle.
5) Cook the muffins for 5 minutes, until the edges look set and the bottom is golden brown. Flip the muffins, and cook the second side for 4 minutes.  
6) At this point, check the internal temperature of the muffins.  If it is at least 200°F, then the muffins are done.  If they aren't quite that hot, remove the rings, place the muffins on a baking sheet and place into the preheated oven for 5 minutes.  Check their internal temperature again.
7)  Repeat steps 4-6 with the second half of the dough.
8) Once muffins have reached an internal temperature of 200°F, transfer the muffins to a rack to cool.
9) If you will not be eating within a day or two, store in the freezer in an airtight bag.  When ready to eat, defrost in the microwave and toast if desired.
(recipe slightly adapted from King Arthur Flour)
Pin It button on image hover