Showing posts with label gluten-free. Show all posts

Thursday, May 22, 2014

Baked Oatmeal

Baked Oatmeal

I've been making this baked oatmeal for breakfast for a couple of months now, so I apologize for not sharing it earlier! I got this amazing recipe from my mom who found it in this cookbook. I had seen baked oatmeal recipes before but didn't give them much thought because I'm perfectly happy with my regular oatmeal + coconut butter + frozen blueberries. I'm so happy I got a chance to try this when my mom made it because it let me see the beauty of baked oatmeal! 

Baked Oatmeal | katesfoodfortheweek.blogspot.com

If you've never had baked oatmeal before it does have a slightly different texture compared to regular oatmeal. But it is also very delicious and this recipe is surprisingly healthy (take a look at the ingredients!). Mark has been loving this and right now definitely prefers it over regular oatmeal. A bonus is that you can throw this together on the weekend and  then you've got quick breakfasts to reheat throughout the week. 

This is the sort of recipe you could definitely modify by substituting different ingredients for those listed in the original recipe. I haven't messed with it much because we both love it as is! 

Baked Oatmeal | katesfoodfortheweek.blogspot.com


Baked Oatmeal

serves: 8-10 (can also be halved and baked in an 8x8 square baking dish to serve 4-5)

INGREDIENTS:
  • 5 cups rolled oats (for gluten-free make sure the oats are certified gluten-free)
  • 3/4 cup raisins
  • 3/4 cup walnuts, chopped
  • 2 apples, cored and grated (I grated them on a cheese grater and the peels came off in the process)
  • 1 tablespoon baking powder
  • 1 teaspoon ground cinnamon
  • 1/8 teaspoon salt
  • 1 teaspoon pure vanilla extract
  • 2 1/2 cups almond milk (or milk of choice)
  • 4 large eggs, beaten
  • 1/4 cup honey
  • For Serving:  Mark likes his topped with some maple syrup and honey yogurt. I like it plain or with frozen blueberries and almond milk. Get creative! 
DIRECTIONS:
  1. In a large bowl, mix together the oats, raisins, walnuts, grated apples, baking powder, cinnamon, and salt. Make sure the apples are distributed evenly throughout.
  2. In a separate bowl, whisk together the vanilla, almond milk, eggs, and honey. Do your best to incorporate the honey.
  3. Pour the wet ingredients over the dry ingredients and mix well to combine.
  4. Transfer the mixture to an ungreased 9x13 baking pan. Cover with aluminum foil and put in the refrigerator.*
  5. Take the oatmeal out of the refrigerator. Preheat the oven to 350F. Once preheated, bake the oatmeal for 30 to 40 minutes until lightly golden on top. Be careful not to over-bake or it will dry out.
  6. Cut into slices and serve in bowls with toppings of choice.
  7. Refrigerate leftovers for up to 5 days. 
*At this point you can leave the unbaked oatmeal in the refrigerator over night if desired. This makes for a delicious breakfast in the morning. If you don't want to wait until morning, I've always let it sit in the refrigerator for at least 3 hours before baking. I'm sure you could bake it immediately and it would turn out great, though perhaps not exactly the same texture.

recipe slightly adapted from Sleep on It

Tuesday, May 6, 2014

Roasted Mushrooms and Zucchini on White Bean Puree

Roasted Mushrooms and Zucchini on White Bean Puree

This dinner was surprisingly delicious. I say surprisingly because as much as I like beans, a bean puree doesn't necessarily sound like the most appealing dinner! However, there were lots of great flavors in this dish that made it both tasty and comforting. Mark even went back for seconds! It was relatively quick to make with lots of good-for-you ingredients, so I definitely plan on making it again in the future.

Roasted Mushrooms and Zucchini on White Bean Puree

This meal is a bean puree (cooked beans, milk, and spices that are blended) that is topped with a portobello mushroom, zucchini, and tomatoes tossed in some olive oil and spices. I made some that were also topped with mozzarella cheese (as shown above). Both versions turned out great! 

FYI- This meal is gluten free and vegetarian. If you leave off the mozzarella cheese, it is also vegan.

Roasted Mushrooms and Zucchini on White Bean Puree

Roasted Mushrooms and Zucchini on White Bean Puree
serves: 3-4

INGREDIENTS:
  • 4 large portobello mushrooms caps, stemmed
  • 1 medium zucchini, thinly sliced
  • 2 tablespoons olive oil, divided
  • 1/2 teaspoon salt, divided
  • 6 cloves garlic, minced and divided
  • 1/2 cup unsweetened plain almond milk (or skim milk but then it won't be vegan)
  • 1/4 teaspoon black pepper
  • 1/8 teaspoon white pepper (if you don't have white pepper, you can omit or use more black pepper)
  • 2 14.5 ounce cans Great Northern beans, rinsed and drained
  • 1 teaspoon dried parsley
  • 3/4 teaspoon dried thyme
  • 1 teaspoon dried oregano
  • 2 medium tomatoes, chopped (I used "tomato on the vine" tomatoes and I did not seed the tomatoes)
  • 4 ounces fresh mozzarella cheese, sliced [omit or leave off of some of the mushrooms to make vegan]

DIRECTIONS:
  1. Preheat oven to 425F.
  2. Place mushroom caps, gill sides down, in a single layer on a baking sheet (it's best if the baking sheet has sides as the vegetables will release liquid). Drizzle with 1/2 tablespoon olive oil and rub the oil into the mushrooms. Once the oven has preheated, bake the mushrooms for 5 minutes.
  3. Meanwhile, combine 1/2 tablespoon olive oil and sliced zucchini.
  4. Remove the mushrooms from the oven and turn them over. Sprinkle mushrooms with 1/8 teaspoon of salt and half of the minced garlic. Layer zucchini slices over the mushrooms (you will need to make more than one layer). It's okay if the zucchini falls off a bit.
  5. Bake for another 6-10 minutes until zucchini is cooked.
  6. While the zucchini and mushrooms cook, combine 1/4 teaspoon salt, remaining garlic, almond milk, black pepper, white pepper, beans, parsley, and thyme in a small saucepan. Bring to a boil. Then, reduce heat and simmer for 3-5 minutes on low heat. Finally, transfer bean mixture to a blender or food processor and blend until smooth. Set aside.
  7. Meanwhile, combine 1/8 teaspoon salt, oregano, and tomatoes in a small bowl and set aside. 
  8. Once the mushrooms and zucchini are cooked, top with sliced mozzarella cheese as desired. Return to oven for 2 minutes until cheese is melted.
  9. Divide puree among plates. Place mushrooms on the puree. Top with the tomato mixture. Serve immediately.
recipe slightly adapted from Cooking Light, discovered on Oh My Veggies

Tuesday, April 29, 2014

Chicken [or Tempeh] and Broccoli Curry with Coconut Rice

Chicken [or Tempeh] and Broccoli Curry

I recently celebrated my 29th birthday! Mark jokingly said "I guess this will be the first of many 29th birthdays".  Ha! I think I'll be okay with proceeding into my 30s, but let's not rush anything!

For my birthday dinner I decided I wanted this yummy broccoli tempeh curry that I had made before but for some reason never posted to the blog. I KNOW I bought the tempeh at the store, but when it came time for us to cook this meal we couldn't find it anywhere! And I mean anywhere. We both searched the refrigerator, then the freezer, then all the cupboards, then the shopping bags, then even my car... nowhere to be found. So we decided it never made it home from the grocery store. Luckily I had some chicken in the freezer so I decided to just substitute the tempeh with chicken. Still tasted great! So moral of the story is this recipe works well with chicken or with tempeh!

Chicken [or Tempeh] and Broccoli Curry

This meal consists of coconut rice topped with chicken and broccoli tossed in a delicious (and pretty healthy) homemade tomato/coconut curry sauce. The sauce is relatively quick to make and I found that overall there was less chopping of ingredients than in some recipes. Had we not spent 15 minutes looking for the tempeh, it would have been ready quickly! Just start cooking your rice first and everything else will be done when the rice is done.

I have a rice cooker and just threw the broccoli in the top of the rice cooker to steam while I cooked the chicken. I forgot to set a timer so I overcooked the broccoli a bit. It still tasted great, but it's better when the broccoli holds its shape better.

I really like the flavors of this dish. If you make it, I definitely encourage you to make the rice as well! I used black rice (I found it in bulk at Costco and we are loving it), but brown rice works too.


Chicken [or Tempeh] and Broccoli Curry

Chicken [or Tempeh] and Broccoli Curry with Coconut Rice

serves: 4

INGREDIENTS:
Coconut Rice
  • 1 cup black rice (or long grain brown rice)
  • 1 cup canned lite coconut milk
  • 1 cup water
  • 1 tablespoon coconut oil
Chicken [or Tempeh] and Broccoli Curry
  • 2-3 bunches broccoli, cut into florets
  • 2 tablespoons olive oil, divided
  • 8 ounces tempeh, cubed OR 1 pound boneless, skinless chicken breasts, cut into bite-size pieces
  • 1 tablespoon butter
  • 1 yellow onion, chopped
  • 1/4 teaspoon cumin
  • 1 1/2 teaspoons curry powder
  • 1/4 teaspoon turmeric
  • 1/4 teaspoon cayenne
  • 1/2 to 1 teaspoon salt (depending on if your tomatoes are unsalted)
  • 1 14.5 ounce can diced tomatoes (don't drain)
  • 1/2 cup water
  • 1/4 cup (or more as desired) lite coconut milk (use the same can that you used for the rice)

DIRECTIONS:
  1. Start by cooking the rice.  Combine all the rice ingredients in a small saucepan (or rice cooker). Bring to a boil, then reduce heat, cover, and simmer for 25-35 minutes until liquid is absorbed. Remove from heat and let rice sit, covered, at least 10 minutes until ready to serve.
  2. Meanwhile, steam or saute broccoli until tender (don't overcook!). Run under cold water to stop the cooking and set aside.
  3. Heat 1 tablespoon olive oil in a large skillet over medium heat. Add tempeh or chicken and cook, stirring occasionally, until cooked through and lightly browned. Remove from pan to a plate and set aside.
  4. Add remaining olive oil and butter to the skillet and turn heat to low. Once butter is melted, add onions and cook until soft and slightly brown, about 5 minutes.
  5. Add cumin, curry powder, turmeric, and cayenne. Stir to combine.
  6. Add in salt, tomatoes, and water. Stir to combine and cook for about 2 minutes.
  7. Transfer onion/tomato mixer to blender. Add 1/4 cup lite coconut milk to blender as well. Blend until thoroughly pureed. Add more coconut milk until desired taste/consistency is reached.
  8. Return pureed curry sauce to skillet. Add chicken/tempeh and stir to combine. Cook over medium-low heat for about 5 minutes until chicken/tempeh is hot. 
  9. Add broccoli and stir to combine. Cook until broccoli is warmed through. 
  10. Remove from heat and serve over coconut rice.
recipe slightly adapted from edible perspective

Friday, April 18, 2014

Chocolate Peanut Butter Mousse [Fast and Healthy!]

Chocolate Peanut Butter Mousse [Fast and Healthy!]

Since seeing this recipe a little over a month ago, I've already made it three times! This chocolate peanut butter mousse is rich and delicious with a wonderful smooth texture. It also takes literally 1 minute to put together, which makes it perfect for Friday night when you want dessert but are too tired for anything complicated.

Chocolate Peanut Butter Mousse [Fast and Healthy!]

So what makes this healthy? It's full of protein, healthy fats, and natural sweeteners. The fats and protein help to make it taste rich and satisfying. The natural sweetener gives it enough sweetness to make it dessert, but doesn't make it taste overly sweet. There are only 4 ingredients in this little gem of a dessert-- cocoa powder, peanut butter, maple syrup, and silken tofu. Yes, tofu! If you are not a tofu fan don't worry, you can't taste it in the end result. 

If you are looking for a new healthier dessert to try, and you are a chocolate peanut butter fan, please try this! Let me know what you think. Also, if you want to try more tofu pudding, try my recipe from last summer for banana pudding!

Chocolate Peanut Butter Mousse [Fast and Healthy!]

serves: 4-6

Head to A Couple Cooks for the recipe and beautiful photos: Chocolate Peanut Butter Mousse Recipe 

Kaitlyn's Notes:
  • You can definitely taste this straight out of the blender, but I do think it's better if you let it sit in the refrigerator for 30 minutes.  
  • I've kept this in the refrigerator for three days and it still tastes just as good to me on the third day. With the tofu, not sure I'd keep it longer than three days.
  • Mark liked this too! (though he won't choose this over ice cream ;) )
Chocolate Peanut Butter Mousse [Fast and Healthy!]

Sunday, February 9, 2014

Black Bean and Quinoa Enchilada Bake

Black Bean and Quinoa Enchilada Bake

Black Bean and Quinoa Enchilada BakeAs much as I love Mexican food, I have never ordered enchiladas from a restaurant before.  Really, I don't have a good reason for this.  It's mostly just that I can't seem to choose anything besides a vegetarian burrito.  Ha!  But when I saw this post a few weeks ago and the author writing "promise me you will make it!" on the recipe, I knew I had to give it a try.

Black Bean and Quinoa Enchilada BakeThe results really were amazing.  Definitely an example of something that tastes way better than it looks!! Mark said many many times how good it was as he was eating it.  He didn't even want me to tell him what was in it because he said it tasted so good he didn't want the truth about whatever healthy things were in it to spoil that for him!  This enchilada bake has quinoa, veggies, black beans, homemade enchilada sauce, and Mexican cheese.  We topped it with avocado and ate it with baked tortilla chips.  The enchilada bake was great for dipping chips in!  While it isn't the healthiest thing you could eat, this is overall a pretty healthy meal.

Black Bean and Quinoa Enchilada Bake

I know I am not posting as frequently as I used to, but I will post great recipes that I find- I want to remember to make them again myself!  So trust me, this was really good.  I will be making it again very soon!

Black Bean and Quinoa Enchilada Bake

serves: 6 (generous servings!)


Kaitlyn's Notes:
  • As you can see by the links, I made my own enchilada sauce.  It was very easy to do so I recommend that!  I made the full enchilada sauce recipe and used it all in the enchilada bake.
  • When I made this I actually made 2/3 of the quinoa, used less cheese (probably 1 cup) and baked in an 8x8 pan to serve 4.  These were big servings, but we devoured it!

Monday, January 27, 2014

Roasted Veggie Quinoa Bowls with Peanut Sauce


Roasted Veggie Quinoa Bowls with Peanut Sauce

I saw this recipe on Annie's Eats a few weeks ago and immediately bookmarked it (peanut sauce? I'm sold!).  The original recipe calls for eggplant, but I haven't quite grown to like eggplant yet... so I used broccoli instead.  Both Mark and I were very impressed with the result.  The peanut sauce has a lot of flavor, and helped to make the dish quite filling.  For dinner we had it warm (since the quinoa had just cooked), but for lunch I had it cold and it was delicious that way.  If you are a peanut butter fan and looking for a new dinner or lunch option, I highly recommend this recipe!

Roasted Veggie Quinoa Bowls with Peanut Sauce


Roasted Veggie Quinoa Bowls with Peanut Sauce
serves: 4-6 (depending on if you eat this for lunch or dinner)

The recipe can be found here.

Kaitlyn's Notes:
  • The original recipe calls for eggplant, onion, snow peas, and bell peppers for the vegetables.  I used broccoli, bell peppers, onion, and snow peas and I increased the overall quantity of vegetables by about 50%.  Feel free to experiment with different vegetables!
  • The vegetables get drizzled in olive oil and roasted.  The peanut sauce also calls for olive oil.  I found the dish a bit too oily overall, so I would use only 1 1/2 tablespoons of olive oil in the sauce next time (and possibly add a bit of water to thin the sauce).  
  • I increased the peanut butter and garlic in the sauce a bit.... because I love peanut butter and garlic. :)

Wednesday, September 25, 2013

Pizza Topped Quinoa + Bean Burgers

Pizza Topped Quinoa + Bean Burgers

These fun burgers are sort of like bagel pizzas except switch out the bagel for a quinoa bean burger.  Weird description?  Perhaps.  They really are just burgers made with beans, quinoa, and Italian flavors that are topped with your favorite pizza toppings.  Mark devoured three of these pretty quickly.  They are delicious! Our only complaint is that they don't hold together very well when you are eating them, so you really do need to eat them with a fork.  I found this recipe over at edible perspective, and she ate these on a piece of bread so that is an option as well.  I opted to skip the bread since the quinoa felt like enough carbs.

Pizza Topped Quinoa + Bean Burgers

I topped these with a spicy homemade tomato sauce, sauteed mushrooms, black olives, and mozzarella cheese.  Of course you could top them with whatever pizza toppings sound good to you.  And don't let the long ingredient list scare you- I've included my recipe for my pizza sauce, but you don't have to use that!  I served these with roasted kale, because Mark and I both LOVE kale, but I recommend serving these with your vegetables of choice.  These pizza burgers really are a great way to satisfy your pizza cravings in a different (and healthy!) way.  As the weather continues to get cooler and warm comfort foods sound like the perfect dinner, give these a try!

Pizza Topped Quinoa + Bean Burgers

Pizza Topped Quinoa + Bean Burgers 

yield: 8 burgers (serves 4 or more, depending on how and with what they are served)

INGREDIENTS:
Burgers:
  • 1/2 cup dry quinoa
  • 1 14 oz can cannellini beans, rinsed and drained
  • 1/2 cup finely chopped onion
  • 3 tablespoons finely chopped basil
  • 1 teaspoon dried oregano
  • 4 cloves garlic, minced
  • 1/2 teaspoon salt
  • 1/2 teaspoon pepper
  • 1/2 teaspoon crushed red pepper flakes (optional)
  • 2 tablespoons olive oil
  • 1 large egg + 1 egg white (or 1 duck egg), whisked
  • 6 tablespoons ground rolled oats (You can grind them in your food processor.  Use gluten-free if desired.  Or try substituting a different type of flour)
  • olive oil for cooking
Spicy Tomato Sauce (or use your favorite pizza sauce):
  • 1 tablespoon olive oil
  • 4 cloves garlic, minced
  • 1/4 teaspoon (or more) crushed red pepper flakes
  • 1 28 ounce can diced tomatoes (no salt added if possible), juice drained out
  • 1/4 teaspoon salt
  • 1 teaspoon dried oregano
Toppings:
  • 10 ounces mushrooms, sliced
  • black olives, sliced
  • mozzarella cheese
  • parmesan cheese

DIRECTIONS:
1) Start by cooking the quinoa.  Combine dry quinoa and 1 cup of water in a small pot.  Set over medium high heat and bring water to a boil.  Once boiling, reduce hit to low and cover the pot.  Let cook for 15 minutes (while you prep other ingredients), until all water is absorbed.  Set quinoa aside to cool slightly.

2) Next start the spicy tomato sauce.  Puree the diced tomatoes (without the juice) in a blender, food processor, or with an immersion blender.  Heat olive oil in a small pot with garlic and red pepper flakes over medium heat.  Once garlic begins to brown, add tomatoes, salt, and oregano.  Stir to combine.  Cover and cook on low/medium-low until ready to use.

3) Process beans in a food processor, or mash thoroughly with a fork.  In a large bowl, combine beans, cooked quinoa, onion, basil, oregano, garlic, salt, pepper, and crushed red pepper flakes.  Add olive oil and eggs and mix.  Add ground rolled oats and mix to combine.  The mixture should be wet, but you should be able to form it into balls that stay together.  If it's too wet, add a couple tablespoons more ground oats (or flour).

4) Divide burger mixture into 8 equal portions and shape into burgers that are about 3/4 inch thick.

5) Heat about 2 teaspoons of olive oil in a large skillet over medium heat.  Once hot, use a spatula to carefully transfer half of the burgers to the skillet.  Cook for five minutes until dark brown on the bottom.  Carefully flip over and cook for another five minutes until browned and cooked through.  If burgers are browning too quickly and not cooking on the inside, lower the heat! Repeat with remaining burgers.  Preheat your oven to low broil in the last few minutes of cooking.

6)  While burgers are cooking, heat a small amount of olive oil in a medium skillet.  Add mushrooms and cook, stirring frequently, until liquid is released and evaporated.  Set aside.

7) Place burgers on a baking sheet.  Top each burger with spicy tomato sauce, mushrooms,  olives, and a sprinkle of mozzarella cheese and Parmesan cheese.  Place in the oven under the broiler for 2-4 minutes until cheese is starting to brown (watch carefully!!).  Enjoy!

(recipe slightly adapted from edible perspective)

Wednesday, September 18, 2013

Lemon Garlic Salmon

Lemon Garlic Salmon

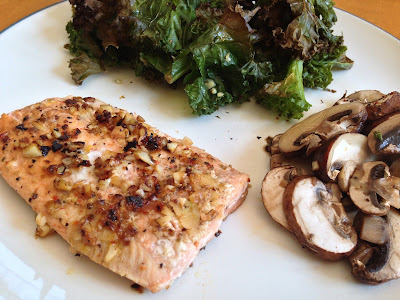
If you've never made salmon before, this is a good recipe to start with.  It is quick, but full of lots of flavor.  Minced garlic, lemon zest, salt, and pepper are sprinkled on top of salmon before it is sauteed in a skillet.  I've made this many times in the past couple of years, but kept forgetting to actually take a picture for the blog!  It was actually Mark who first introduced me to cooking salmon.  He used to load it up with lots of lemon pepper before cooking it, and over time I've modified his version to this version.  We're both big fans of garlic, so the addition of garlic was not a hard sell. :)

Lemon Garlic Salmon

This time I served the salmon with roasted kale and mushrooms, but I often use whatever vegetables sound good on the side.  You can also serve this with rice/bulgar/quinoa/bread if you are in the mood for carbs as well.  Recently I've been trying to have the majority of my plate be vegetables plus some protein and not focusing on the carbs.

Lemon Garlic Salmon

Once you try this salmon recipe, I bet it will quickly become part of your regular rotation for fast weeknight dinners!

Lemon Garlic Salmon

serves: 4

INGREDIENTS:
  • 1 tablespoon olive oil
  • 4 4-6 oz salmon fillets (I buy them frozen and skinless-- if yours are frozen then defrost before using in the recipe)
  • 5 large cloves garlic, minced
  • 1 lemon
  • salt + pepper

DIRECTIONS:
1) Heat olive oil in a large skillet over medium heat.

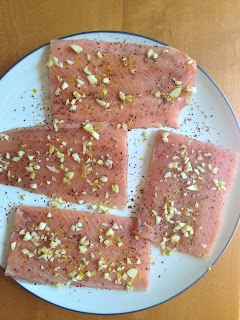
2) Zest the lemon and then juice the lemon, saving the juice in a small bowl.  Set the lemon juice aside.  Coat both sides of each salmon fillet with garlic and lemon zest.  Then, sprinkle both sides of each salmon fillet with salt and pepper (I used about 1/2 teaspoon of each total).  Note: If your salmon has skin, coat only the skinless side with garlic, lemon zest, salt, and pepper.
Lemon Garlic Salmon

3) Once your pan and olive oil are hot, add coated salmon fillets (Cook salmon in two batches if necessary).  Cook for about 2 minutes until the edges of the salmon start to look cooked.  Add lemon juice to the pan.  Flip each fillet and cook on the other side for about 3 more minutes until completely cooked.  The outsides of the fillets should be browned and the inside temperature should be 145F.  Note that the length of time necessary to cook the salmon will vary depending on how thick it is.

4) Serve immediately with roasted vegetables or a salad.

Sunday, August 11, 2013

Dark Chocolate Cookies [Gluten-Free!]

Dark Chocolate Cookies [Gluten-Free!]

These dark chocolate cookies are rich and dense with a great fudge-y texture.  The fact that they are gluten-free is a bonus, but trust me they are very good and not just for a gluten-free cookie!

Dark Chocolate Cookies [Gluten-Free!]

I've made these a number of times and shared the recipe with a few others as well.  Everyone who has ever made them or tried them has given them great reviews.  Definitely give them a try if you are a chocolate lover.  Enjoy!

Dark Chocolate Cookies [Gluten-Free!]

Dark Chocolate Cookies [Gluten-Free!]

yield: about 20-24 cookies

INGREDIENTS
  • 1 1/2 cups semisweet chocolate chips (about 9 ounces), divided [make sure certified gluten-free if this is relevant]
  • 3 large egg whites
  • 2 cups powdered sugar, divided
  • 1/2 cup unsweetened cocoa powder
  • 1 tablespoon cornstarch
  • 1/4 teaspoon salt

DIRECTIONS
1) Preheat your oven to 350F.  Line 2 baking sheets with parchment paper/baking mats or spray with nonstick cooking spray.

2)  Melt 1 cup of the chocolate chips in the microwave.  This will take about 2 minutes on high, but check and stir every 30 seconds.  Set aside to cool slightly.

3) Fit your stand mixer with the whisk attachment.  Beat the egg whites until they form soft peaks, about 3 minutes.  Add 1/2 cup powdered sugar.  Continue beating until the mixture resembles soft marshmallow creme.

4)  In a separate bowl, whisk together 1 more cup of powdered sugar, cocoa powder, cornstarch, and salt.

5)  On low speed, beat dry ingredients into the egg white/sugar meringue until combined.  Add melted chocolate and remaining chocolate chips and stir to combine.  The dough should be fairly stiff, but still a little wet.

6) Put remaining powdered sugar in a small bowl.  To make the cookies, roll about 1.5 tablespoons of dough into a ball, and then roll in sugar.  Place on the prepared baking sheet and press down on the top of the cookie to flatten slightly.  Repeat with remaining dough, evenly spacing the cookies on the baking sheets.  Note: you will probably not use all of the remaining sugar!

7)  Bake cookies in the preheated oven for about 10 minutes, until the cookies are puffed and the tops are cracked.  Remove from the oven and let cool on the baking sheets for at least 10 minutes.  Then, transfer to a cooling rack to cool completely.

These keep well at room temperature for at least 3 days.

(recipe adapted from epicurious)

Saturday, August 3, 2013

Banana Pudding

Banana Pudding

I've already mentioned this banana pudding multiple times on the blog because I've become pretty obsessed with it.  The fact that I don't really like bananas makes this whole obsession pretty mysterious, but what can I say- it's delicious!  The recipe came from chocolate covered katie, but I wanted to put in writing the specific way that I've been making it.

Banana Pudding

Traditional banana pudding has chunks of banana and vanilla wafers mixed in.  I prefer this plain or topped with blueberries.  I really have to work hard to make it last for four days (hiding it way in the back of the refrigerator helps).  I love that it is a good source of protein and vitamins and what some people claim is a healthy fat (coconut butter).  That's more than you get from most desserts!

Banana Pudding


Banana Pudding

serves: 4

INGREDIENTS

  • 2 very ripe bananas, mashed with a spoon (the riper the better)
  • 1/4 teaspoon salt
  • 1 teaspoon vanilla extract
  • 3 tablespoons coconut butter
  • 1 11.5 ounce package silken tofu (I use the kind from Trader Joe's-- it is sold in a box and not refrigerated)
  • 2 tablespoons granulated sugar
  • optional:  1/8 teaspoon turmeric (helps to make it a bit more yellow)

DIRECTIONS:
1) Combine all ingredients in the bowl of a food processor and process until completely smooth, about 2 minutes.

2)  Serve immediately or store in the refrigerator for a few days.  The top layer of the pudding will turn brown in the refrigerator from the bananas, but it still tastes excellent.

(recipe barely adapted from chocolate covered katie)

Wednesday, July 24, 2013

Jalapeno Cheddar Turkey Burgers

Jalapeno Cheddar Turkey Burgers

In my continuing quest for more recipes that don't require an oven, I came upon these turkey burgers.  They were originally actually chicken burgers (made with ground chicken), but I had ground turkey so that is what I used!  These were delicious topped with diced avocado and salsa (sort of like guacamole).  Mark liked them so much that he wanted the leftovers for breakfast the next morning.

Jalapeno Cheddar Turkey Burgers

Wondering what sort of weird "bun" these are served on?  I didn't have any hamburger buns on hand and I wasn't about to turn on my oven, so I continued my fun with grilling bread.  I rolled out some pizza dough from the freezer (again) so that it was fairly thick.  I grilled it on both sides and it completely puffed up- filling up with air like a balloon!

Huge Pita on the Grill

That was awesome.  And also meant that I had essentially made one huge pita.  So after removing the bread from the grill I cut it into four sections and split it open.  I now had four burger pockets.  While I would have served these with traditional burger buns if we had them, we both actually really liked these pockets.  They held the topping well so it was overall less messy.  Also, they didn't make the burger too tall to fit your mouth around.... so- a winner!  I'll definitely do this idea again for burgers.  If you're not up for making your own grilled bread (though it is super easy), you could always just buy pita bread at the store if you want to try eating these in that way.

A couple of notes about the burgers.  They were definitely spicy so you might want to use less jalapeno if that is not your thing.  Or just be careful about the salsa on top.  Also, there are no breadcrumbs in the burgers, so the burgers themselves are gluten-free!

However you eat these burgers, they are definitely a great use for your grill this summer.   [Speaking of summer, Mark says he misses winter... did he really grow up in California? ;) ]

Jalapeno Cheddar Turkey Burgers

Jalapeno Cheddar Turkey Burgers
*burgers by themselves are gluten-free

serves: 4

INGREDIENTS:
  • 1 to 1 1/2 pounds ground turkey (I used 1 1/4 pounds)
  • 1/2 cup finely diced yellow onion (about 1/2 a small yellow onion)
  • 1/3 cup finely chopped fresh cilantro
  • 3 cloves garlic, minced
  • 1 jalapeno, seeded and finely diced
  • 1 teaspoon ground cumin
  • 1 teaspoon chili powder
  • 1/3 cup shredded cheddar cheese
  • 1/2 teaspoon salt
  • 1/2 teaspoon ground black pepper
Suggestions For Topping/Serving:
  • burger buns/ pita bread/ etc.
  • cheddar cheese
  • diced avocado/ guacamole
  • salsa

DIRECTIONS:
1)  Heat your grill to medium-high heat.  Combine all burger ingredients in a large bowl and mix until combined (don't over-mix).  Form into 4 patties.

2)  Cook the patties on the grill about 4 minutes per side until the internal temperature of each is 165F.  In the last couple of minutes, top with additional shredded cheese if desired.

3)  Assemble burgers in buns/pita/grilled bread and top as desired.  Guacamole and salsa is delicious.

(recipe adapted from Annie's Eats, originally from What's Gaby Cooking?)

Wednesday, June 5, 2013

Seed "Bread"

Seed "Bread"

With all the classes I teach being exactly during meal times, I've been loving having food that is easy to transport and eat, but also nutrient packed and filling.  The life-changing loaf of bread was a real win, so I was excited when I found a similar bread on Oh She Glows recently that actually looked even easier to make.


Seed "Bread"
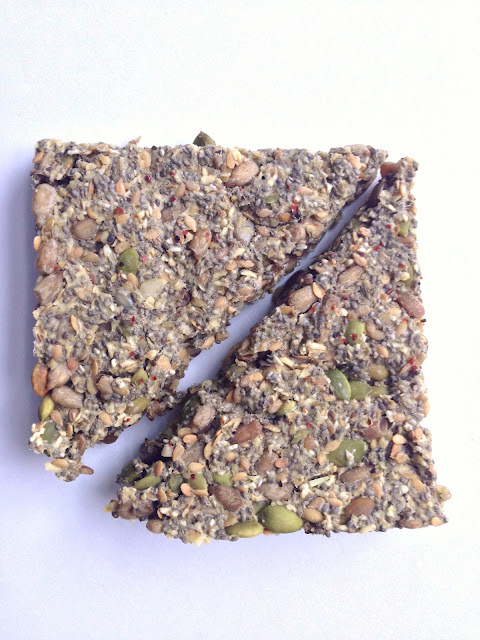
This "bread" is baked in an 8x8 pan and then cut into triangles.  It is super dense and packed with four different types of seeds, oats, and spices.  It is not anything like yeast bread, but I'm not really sure what to call it besides bread.  It's also not like a cracker... So, I'll just call it "bread" and then not worry too much about it!

I was super impressed by this bread and have been loving it.  Unfortunately, Mark did not like it at all!  I guess that goes to show that we are not the same person.  haha!  We are similar in a lot of ways so it always surprises me when we are completely opposite on something.  I think this bread has tons of flavor, so I haven't been eating it with anything on it.  The oregano and thyme in it remind me vaguely of pizza.

This seed bread really is dense.  Each triangle slice has about 200 calories, 13 grams of fat (from those seeds!), 9 grams of protein, and 7 grams of fiber.  I  keep it in the freezer and take out a slice on the days that I'm teaching.  It defrosts in a couple of hours.  It makes the perfect small meal with some cut up veggies and fruit.  

If this bread sounds like your thing you should give it a try.  Let me know if you like it!

Seed "Bread"

Seed "Bread"
*If you use certified gluten-free oats, this bread is gluten-free

yield: 8 slices

INGREDIENTS:
  • 5 tablespoons chia seeds
  • 3 tablespoons flax seeds (whole)
  • 1/2 cup sunflower seeds (roasted or raw)
  • 1/2 cup pumpkin seeds (roasted or raw)
  • 3/4 cup oats, ground into a flour in a blender or food processor
  • 1 teaspoon dried oregano
  • 1/2 teaspoon dried thyme
  • 1/2 teaspoon garlic powder
  • 1/2 teaspoon salt
  • 1 teaspoon sugar
  • 1 cup water
  • black pepper (optional)

DIRECTIONS:

1) Preheat oven to 325F and line an 8x8 pan with foil or parchment paper.  Spray with cooking spray.

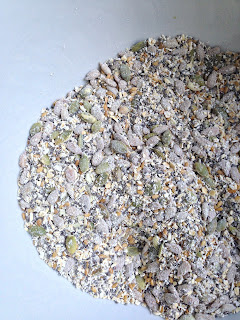
2) In a medium bowl, combine all ingredients except water.

Seed "Bread"

3)  Pour water over mixture and stir to combine.  Within 2 minutes most of the water will get absorbed by those chia seeds!

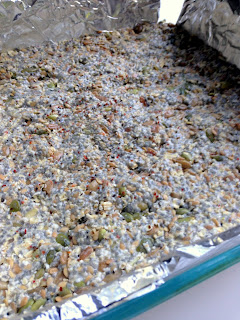
4)  Transfer to the prepared baking dish.  Spread it out and press it down with a spatula so it is in one even layer.  Sprinkle with a bit of black pepper, more salt, and/or any other spices you like that you think would taste good.

Seed "Bread"

5)  Bake in the preheated oven for 30 minutes.

6)  Remove from the oven and lift up the foil to remove the bread.  Cut into 8 triangles.  Transfer the triangles to a baking sheet. Flip the triangles over so the side that was originally on the bottom of the pan is now on the top.  Return to the oven to bake for another 5-10 minutes until edges are slightly crispy.

7)  Remove from the oven and let cool for a few minutes.  Store any pieces you won't eat within a day in the freezer and defrost at room temperature or reheat in the toaster (slices will be crispier that way) if desired.

Seed "Bread"

(recipe adapted from Oh She Glows)

Tuesday, May 14, 2013

Red Curry Lentils

Red Curry Lentils

I tend to like all kinds of curry, but I don't remember ever having curry with lentils before this.  When I found this recipe it looked delicious and I was definitely intrigued!  I thought this dish was very tasty and I loved that the lentils make it super filling.  The red curry has lots of spices and flavors, but isn't really spicy-hot (by my standards!).  It does take a little bit of time to prepare this meal because you have to cook the lentils, but while those are cooking you can prep the other ingredients.

I served this over brown rice and roasted up some kale to have on the side as well.  This curry would also be delicious with another type of grain or even naan.  One great thing about this dish is that it tastes even better as leftovers, after the flavors have really had a chance to meld together.  This will be great to reheat for lunches!

Red Curry Lentils

Red Curry Lentils

serves: 4

INGREDIENTS:
  • 1 cup lentils (I used regular brown lentils)
  • 1 tablespoon coconut oil
  • 1 small yellow onion, minced
  • 3 cloves garlic, minced
  • 2 teaspoons minced ginger
  • 2 tablespoons red curry paste
  • 1 teaspoon granulated sugar
  • 1/2 teaspoon cumin
  • 1/4 teaspoon coriander
  • 1/4 teaspoon black pepper
  • 1/4 teaspoon cinnamon
  • 1/8 teaspoon cloves
  • 1/8 teaspoon nutmeg
  • pinch cayenne pepper + more if desired 
  • 1 cup chickpeas (if from a can, drain and rinse)
  • 1 15 ounce can tomato puree (no salt added if possible)
  • 1/3 cup coconut milk or coconut cream
  • rice/naan for serving
  • handful of chopped cilantro leaves for garnish

DIRECTIONS:

1)  Cook the lentils according to their directions.  Drain and set aside.

2)  Heat coconut oil in a large saucepan over medium heat.  Add the onion and cook for a few minutes until starting to turn brown.  Add garlic, ginger, curry paste, sugar, and all the spices.  Stir and cook for 1-2 minutes.  Add the tomato puree and bring to a simmer.  Stir until relatively smooth.

3)  Add the lentils, chickpeas and coconut cream/milk.  Stir to combine and cook over low heat for about 15 minutes, stirring occasionally.

4)  Serve over rice or with naan and garnish with cilantro if desired.

(recipe adapted from Pinch of Yum)

Saturday, May 4, 2013

Almond Oat Chocolate Chunk Cookies

Almond Oat Chocolate Chunk Cookies

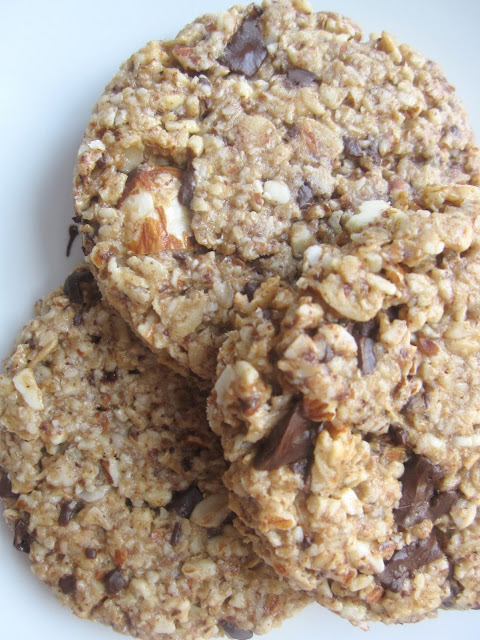
A few weeks ago I won a tin of cookies from the Momofuku Milk Bar in NYC.   They were called "Perfect 10 Cookies", consisting of 10 ingredients.  They also happened to be gluten free and vegan.  They were a bit crunchy (in a shortbread sort of way) and not too sweet, but had lots of oat and almond flavor.  Though they were pretty different from the cookies I typically make, they were really tasty (and sometimes it's nice to have something different!). Mark and I both enjoyed them and quickly polished off the tin.  The recipe was posted online, so I knew I wanted to try to make them.

Almond Oat Chocolate Chunk Cookies

The original recipe makes 20 LARGE cookies.  I scaled down the recipe and modified it slightly.  I've tried it a few times now, and we aren't sick of the cookies yet!  I've also shared them with four other people and everyone has been a fan.  They are hearty and full of healthy fats and fiber, so you don't have to feel too guilty indulging.  Also, because they are vegan and have no eggs, you can eat as much as the cookie dough as you want!   If you or someone you know eats gluten free or vegan, these are a great dessert/snack recipe to have on hand.  But even if you aren't gluten free or vegan, I encourage you to make these because they're really good!

Almond Oat Chocolate Chunk Cookies

Almond Oat Chocolate Chunk Cookies
*gluten-free and vegan

yield:  about 30 2 1/2 inch cookies

INGREDIENTS:
  • 2 1/3 cups whole almonds, divided [I used raw, I'm sure roasted would be fine]
  • 2 1/2 cups oats, divided [if gluten-free is important, make sure to use certified gluten-free oats]
  • 1/4 teaspoon salt
  • 1 teaspoon cornstarch
  • 1/8 teaspoon baking soda
  • 1/2 teaspoon baking powder
  • 1 teaspoon espresso powder [optional]
  • 4 teaspoons vanilla extract
  • 1/4 cup olive oil
  • 1/4 cup coconut oil, melted [or, you could use more olive oil]
  • 1/3 cup agave [or maple syrup]
  • 1/2 cup chopped chocolate/mini chocolate chips [I used dark chocolate]

DIRECTIONS:

1)  Combine 2 cups almonds and 1 1/2 cups  oats in a food processor.  Process for about 30 seconds until they are very finely chopped, almost like a flour.  Add remaining almonds and process for a few more seconds until those almonds are roughly chopped.  Transfer to the bowl  of a stand mixer (or another large bowl).

2)  Add remaining oats, salt, cornstarch, baking soda, baking powder and espresso powder to almond and oat mixture.  Mix with the paddle attachment (or with a large wooden spoon) until combined.

3)  In a small bowl, combine vanilla, olive oil, coconut oil, and agave.  Pour over dry ingredients and mix with paddle attachment (or wooden spoon) until combined.    Add in chopped chocolate and mix to combine.

4)  Turn onto a clean work surface.  At this point the mixture will look wet and be slightly sticky.  [It sort of looks like bird food, right?  It tastes really good- try it!]

Almond Oat Chocolate Chunk Cookies

5)  Use a rolling pin to roll the dough into an even 1/2 inch thickness.  Use your hands to press in around the sides to make sure the dough is really compact.

Almond Oat Chocolate Chunk Cookies

6)  Preheat oven to 300F.  Line 2 baking sheets with parchment paper or baking mats.  Use a biscuit cutter (I used a 2 1/2 inch size, a drinking glass or other cookie cutter would also work) to cut out cookies and transfer to baking sheets.  They stuck to the inside of my biscuit cutter when I did this, so I was able to transfer them and pop them out.  If they are completely falling apart, make sure the dough is compact enough.  Re-roll/press dough as necessary until you have used all the dough to make the cookies.   The cookies won't expand much as they bake, so they can be fairly close together on the baking sheets.

Almond Oat Chocolate Chunk Cookies

7) Bake cookies one tray at a time in preheated oven for 12 minutes each. They will look very slightly brown.  Let cool for a few minutes on the baking sheet.  Then transfer to a wire rack to cool completely.

8)  Store at room temperature for a few days or in the freezer for longer storage (to  heat them up from the freezer, try toasting them on "dark" in a toaster oven directly from the freezer-works great!).

(recipe adapted from the Momofuku Milk Bar)

Wednesday, May 1, 2013

Greek Salad with Falafel

Greek Salad with Falafel

Whenever I go to a restaurant that has falafel, I inevitably wind up ordering it. As much as I might look at the menu and think about other options, I have falafel so rarely that whenever I get an opportunity, it's hard to pass it up!  Of course, I'm sure the fact that most falafel is fried has a lot to do with its tastiness.

I've tried making falafel at home a few times, always baking or frying in a bit of oil.  Past recipes never impressed me, but when I saw this recipe for falafel last week I decided to give homemade falafel another shot.  This recipe is interesting because the bulk of the falafel is made up of  kaleidoscope chard.

The result? Really good!  Mark described them as "light and fluffy", which was better than past recipes that created dense little disks.  I think serving them with hummus is key, though I took it a step further and had them on top of a Greek salad.   This was a delicious dinner, and I'll definitely being using this falafel recipe in the future!

Greek Salad with Falafel

Greek Salad with Falafel

serves: 4

INGREDIENTS:

For the Falafel:
  • 4 cups packed chard (I used kaleidoscope chard)
  • 1 15.5 ounce can chickpeas, rinsed and drained
  • 4 large cloves garlic
  • 1 tablespoon sesame seeds
  • 1/2 tablespoon olive oil
  • 2 tablespoons lemon juice
  • 1/4 teaspoon cumin
  • 1/4 teaspoon black pepper
  • 1/8 teaspoon salt
  • 6 tablespoons oats, ground into a flour (or another flour, though won't necessarily be gluten-free)
  • 2 tablespoons olive oil, for frying
For the Salad:
  • 3 medium tomatoes, chopped
  • 1 small red onion, chopped
  • 1/2 English cucumber, chopped
  • 1 red bell pepper, chopped
  • 1 green bell pepper, chopped
  • 1/2 cup kalamata olives, chopped
  • 2 ounces feta cheese, crumbled
  • 1 teaspoon dried oregano
  • 1/2 teaspoon black pepper
  • 1 tablespoon olive oil
  • 3 tablespoons red wine vinegar
  • 12 ounces baby spinach
  • hummus for topping

DIRECTIONS:

1)  Start by making the falafel:  Add chard, chickpeas, garlic, sesame seeds, and olive oil to the bowl of a food processor.  Process until smooth.  Add lemon juice, cumin, black pepper, and salt and continue to process until combined and smooth.  Turn out into a bowl.

2)  Add oat flour and stir to combine.  Form into falafel patties (I made 18, each about 2 tablespoons).

3)  Heat 1/2 tablespoon olive oil in a large skillet over medium-high heat.  Once hot, carefully add some of the falafel patties one by one using a spatula.  Don't overcrowd the pan.  Cook the falafel for 3-4 minutes until dark brown.  Flip and cook the falafel for another 3-4 minutes on the second side.  Repeat with remaining falafel patties.

4)  Meanwhile, prepare the salad.  In a large bowl, combine tomatoes, red onion, cucumber, peppers, olives, cheese, oregano, black pepper, olive oil, and red wine vinegar.  You can stir in the baby spinach as well, or serve the rest of the salad layered on top of the spinach.

5)  Once falafel are done, serve over salad with dollops of hummus on top.

(recipe adapted from minimalist baker)
Pin It button on image hover