Whitney and Jesse's Wedding Desserts
1) Hummingbird Cupcakes (this is a banana/coconut/pineapple cupcake)
We used this recipe for the cake, then topped each cupcake with a layer of pineapple curd. Finally, we frosted each cupcake with this frosting (made with half butter/ half shortening and a couple drops of coconut extract). *Note- shortening helps to prevent melting if it's going to be hot!*
2) S'Mores Cupcakes (use a kitchen torch to achieve the toasted look on the top!)
We made this recipe.
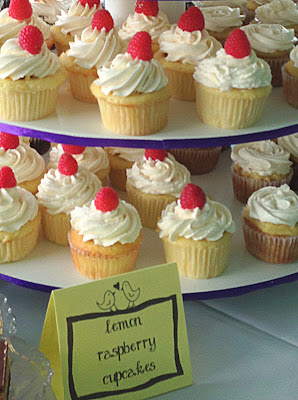
3) Lemon Raspberry Cupcakes
We made this recipe for the cake/filling and this recipe for the frosting (made with 1/2 cup vegetable shortening and 1/2 cup lemon curd + 1 teaspoon vanilla extract + 3 teaspoons lemon emulsion added at the end), topped with raspberries.
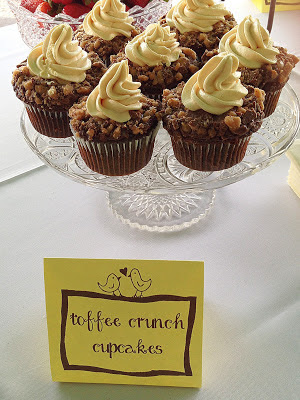
4) Toffee Crunch Cupcakes
We used this recipe for the cake/ganache and this recipe for the frosting (used half butter/ half shortening and added a few tablespoons of salted caramel made without a vanilla bean).
5) Toffee-Crunch Two Layer Cake
We used this recipe for the cake/ganache and this recipe for the frosting (used half butter/ half shortening and added a few tablespoons of salted caramel made without a vanilla bean).
The cupcake recipe as written was exactly enough for two 9-inch layers. I found this tutorial helpful as I planned out what I was going to do. Here is how I put the cake together:
- Make the two layers of cake. Remove from pans and let cool. Transfer to the freezer to partially freeze.
- Cut each layer in half with a long serrated knife. Top three of the cake layers with a thin layer of ganache (all but the top layer). Refreeze. It helps if you keep each cake layer on a 10 inch cake circle.
- To build the cake, start with the bottom layer on a 10 inch cake circle. Spread with a layer of frosting and sprinkle on toffee bits. Top with next cake layer and repeat. Top with next cake layer and repeat. Top with final cake layer (but don't add frosting or anything yet). Freeze everything.
- Top whole cake with a crumb coat of frosting. Refreeze.
- Top whole cake with real layer of frosting. Don't put much frosting on the top of the cake since it will later be covered with ganache. Lightly press toffee bits onto sides of cake. Don't worry when they get all over the place (haha!). Decorate edges with frosting. Refreeze.
- Pour ganache onto top of cake and put more toffee bits in the center (ganache should be pour-able but not at all hot).
- Freeze until night before wedding.
6) Buckeye Brownies
We made this recipe.
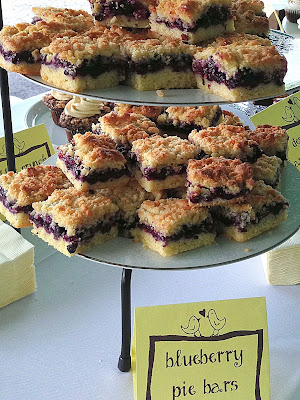
7) Blueberry Pie Bars
We made this recipe, though used more egg in order to help the "crumble" stay together better.
Every dessert was delicious and I would recommend all of them. The toffee crunch cupcakes went the fastest, but that is partly because there were the fewest number of them and with the toffee bits on the sides they look extra visually appealing. Now for how we did this...
Step 1: "Rough Draft" Plan
Whitney liked the idea of having a variety of desserts (as opposed to a big traditional wedding cake), but besides that she was pretty open about what specifically we made. As soon as she asked us, my mom and I started brainstorming desserts that would work. The criteria:
- delicious (obviously)
- easy to make single servings in advance (no cutting/serving day of)
- can stand up to the heat (a late June wedding could be very hot!)
In March, my mom and I sat down to make a rough draft plan. We made a list of all of our ideas and slowly narrowed it down. We decided on four different cupcakes (two chocolate based, two fruit based), and two non-cupcake desserts (one chocolate based, one fruit based). We also decided on bowls of strawberries since June makes us think of strawberries and they are a great healthy dessert option. A couple of the desserts we hadn't made before, so we decided in the next couple of months that we would test them.
We also planned out the presentation of the desserts. We decided we wanted a large central display for the cupcakes, and then platters and other stands for the rest. My amazing dad built the large central display with masonite cake boards and pvc pipe as inspired by a stand I found here. I also decided to make labels for each dessert since we would be having multiple desserts that are not necessarily traditional, so people would know what they were eating!
We each tested the desserts we hadn't made before that were on our list. Most were great, but we decided to eliminate the espresso macarons that we had initially been thinking about. They are a super finicky cookie, and we decided it would add unnecessary stress in the week before the wedding to try to make them. I had Whitney try a couple of the other desserts since we live nearby. With positive feedback from the bride we knew we were good to go!
Step 3: Finalize Plan
We finalized the desserts we were going to make, decided on the numbers of each, and split up the responsibilities. Whitney was anticipating 130 people at the wedding. We knew that with a variety of desserts many people would try more than one, so we made enough for two per person. The final plan was:
- 48 hummingbird cupcakes
- 48 s'mores cupcakes
- 48 lemon raspberry cupcakes
- 24 toffee crunch cupcakes
- toffee crunch two-layer cake (for traditional "cake cutting" and for W+J to save for anniversary)
- 48 buckeye brownies
- 48 blueberry pie bars
- strawberries
We did end up having extra desserts, but somehow that is never a problem :). If I were to do this again I would make the same number.
Step 4: Plan for Shopping/ Baking
The great thing about baked goods is that they freeze very well. Did you know you can freeze a frosted cupcake and it will taste delicious when allowed to defrost at room temperature? A big chest freezer is your best friend with this task. I was able to make desserts for two weeks prior to the wedding and I had plenty of room to store dozens of cupcakes and desserts until the afternoon of the wedding. If you do this, I would not recommend making anything more than a month prior to the event.
Before baking, I looked through all the recipes I was going to be making and made a list of all the ingredients I would need and went shopping. There's nothing more annoying than running out of sugar in the middle of a recipe! (I needed 4+ pounds of butter, 7+ pounds of sugar, and 30+ eggs just for my half of the desserts!)
I also planned out when I would make each dessert or part of a dessert. Most of the recipes had multiple components, so I split them up over multiple days. I strongly recommend making and freezing the cake part of cupcakes on one day and then frosting and refreezing on another day! This makes it much easier and there is zero risk of the frosting melting as you put it on the cupcakes.
Step 6: Bake
Once everything was planned, the actual baking wasn't difficult. The hardest part was trying not to stress about various things not coming out perfectly (thanks to Mark and my dad for telling me and my mom to calm down!).
As I made the cupcakes, I stored them in these plastic cupcake carriers (very inexpensive, and even reusable). This makes them easy to move around. I even frosted them while they were in the containers. For the bars, I cut them into squares and put them onto a baking sheet and froze them. Then, I transferred them to gallon size freezer bags, and stored in the freezer.
Step 7: Wedding!
We left the cupcakes in the freezer until we left for the wedding. They only take a couple of hours to defrost when it is hot out. We took the 2-layer cake out of the freezer the night before and left it on the counter to make sure it wouldn't be frozen in the middle. Then, we left it in the refrigerator for the afternoon before the wedding so the frosting would harden up.
Step 8: Freezing the Two-Layer Cake for the Newlyweds
W+J ate one piece of the cake at their wedding, and I brought the rest home for them. I froze it overnight and then cut it into slices the next morning. I wrapped each slice in plastic wrap, put the slices into freezer bags, and stored in the freezer for the newlyweds! My hope is that by wrapping each slice individually, it will last longer in the freezer and be easier from them to take out only the number of slices they want as they eat it.


Not surprised Whitney asked you guys to make the desserts!! Everything looked great and I know tasted delicious. What a wonderful gift and memory you gave them :)
ReplyDeleteDidn't know how to post my name...oops! Love ya, Kelly
DeleteThanks Kelly!! :)
DeleteSo awesome! Thank you so very much Katie! Everything was perfect and delicious!! Love, Whit
ReplyDeleteYou are so welcome Whitney! :)
Delete