Showing posts with label dinner. Show all posts

Sunday, August 3, 2014

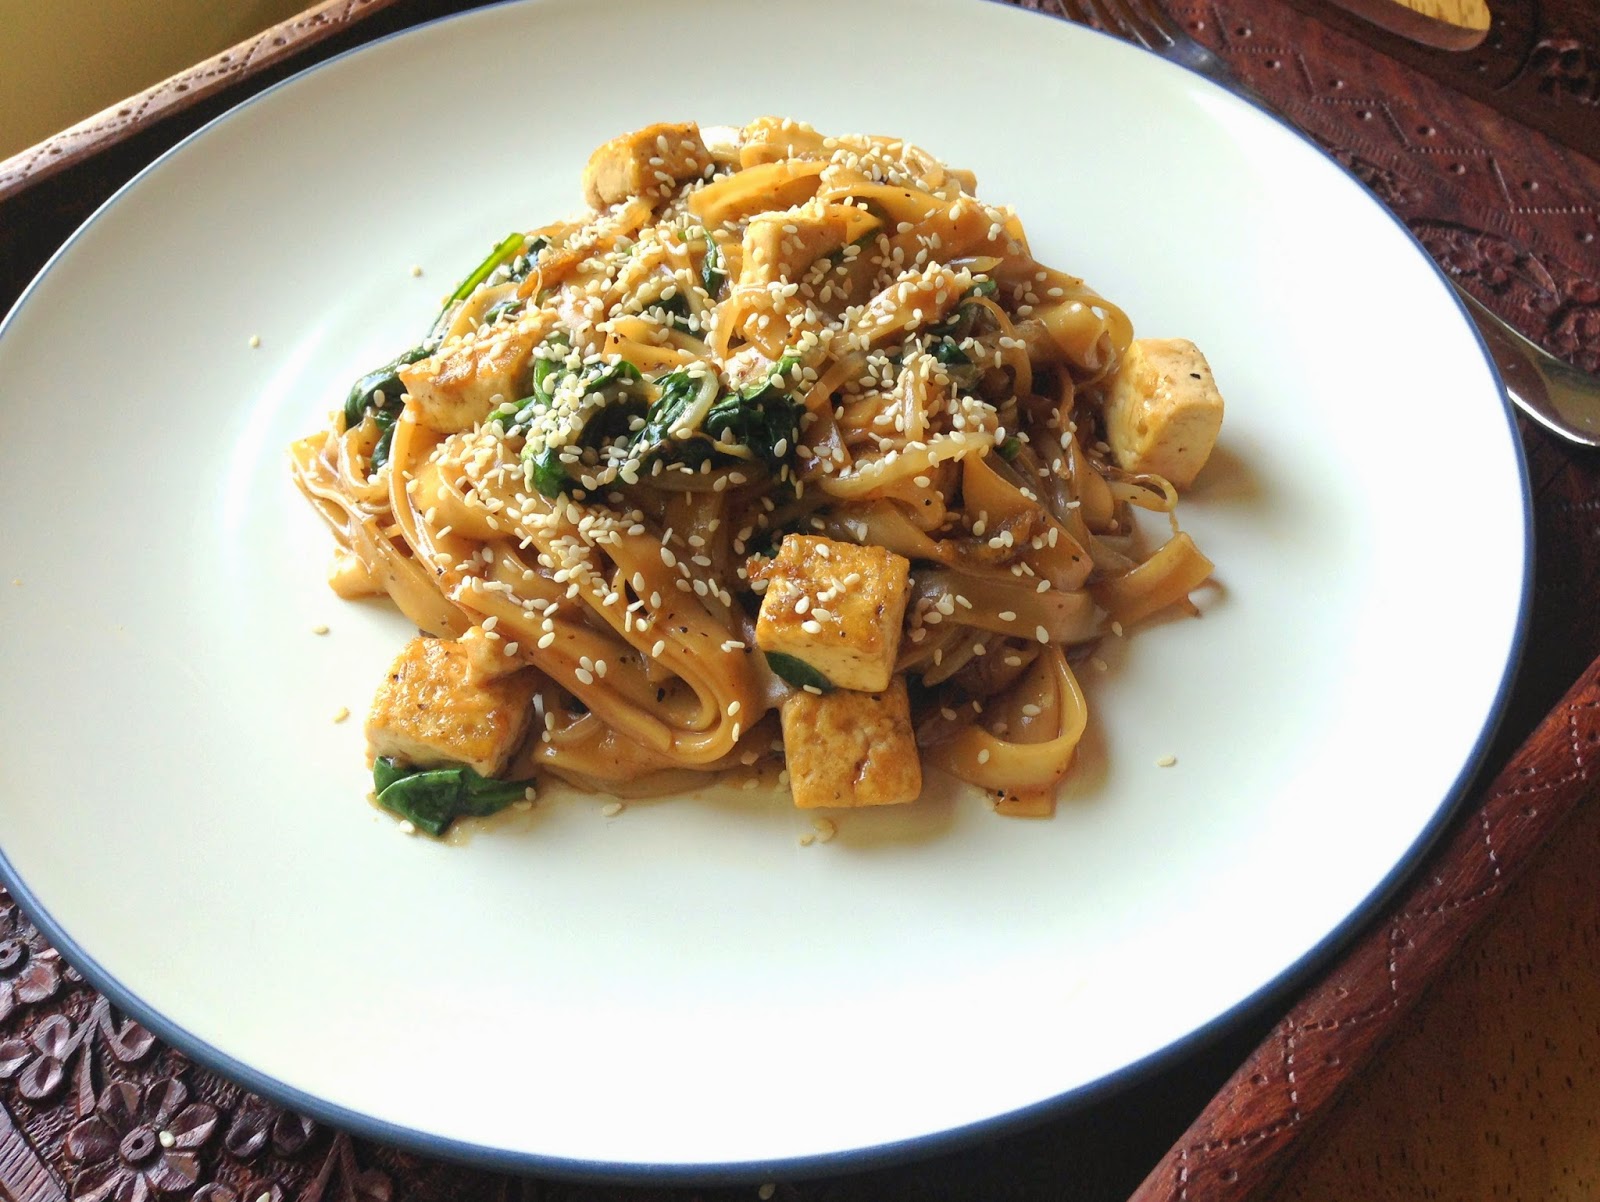
Black Pepper Stir Fried Noodles

Black Pepper Stir Fried Noodles

I cannot believe how fast this summer is flying by! I've tried two new recipes recently that I loved and I'm excited to share them with you. :) You'll get the first recipe today and the next one will be coming soon!

This first recipe is a yummy Asian noodle recipe-- Black Pepper Stir Fried Noodles. I modified the original recipe in a couple ways.  First, I added bean sprouts! From making Pad Thai I learned that you can add a ton of bean sprouts and when they cook in with everything else it is essentially impossible to distinguish them from the noodles. What this means is that you can get a large serving of what looks like just noodles, but it's actually half bean sprouts! More nutritious without you even noticing. Also, the original recipe called for udon noodles which I couldn't find so I used lo mein noodles and they worked great. So the lesson is that the exact noodle you use is flexible.

Black Pepper Stir Fried Noodles

The black pepper sauce has lots of flavor but isn't overly spicy. If you are craving a big bowl of Asian noodle comfort, go for this. It comes together relatively quickly and it's quite tasty! 


Black Pepper Stir Fried Noodles


Black Pepper Stir Fried Noodles

serves: 4

INGREDIENTS:
Black Pepper Sauce:
  • 1/2 tablespoon black pepper (or freshly ground black peppercorns)-- [tablespoon is not a typo!]
  • 5 tablespoons soy sauce
  • 3 tablespoons mirin
  • 2 tablespoons honey
  • 1 1-inch piece ginger, peeled and roughly chopped
  • 3-5 cloves garlic
  • 2 tablespoons cornstarch dissolved in 6 tablespoons water
Stir Fried Noodles
  • 2 tablespoons sesame oil
  • 8 ounces udon noodles (or lo mein noodles or rice noodles... even linguine if necessary)
  • 1 bag of mung bean sprouts (mine was 12 ounces but  you could use a bit more or less depending on what you find)
  • about 1/2 cup water
  • 2-3 cups baby spinach leaves
  • 1 pound extra firm tofu, drained, pressed, and cut into cubes (make sure to get out as much water as possible) [Note: You can substitute chicken if you prefer]
  • sesame seeds for topping

DIRECTIONS:
  1. Bring a large pot of water to a boil. Add noodles and cook for just a few minutes. They should be soft but not at all done. They will continue cooking later with the rest of the ingredients and you don't want them to end up over-cooked. Drain and rinse with cold water. Set aside.
  2. Place all sauce ingredients in a blender or food processor and blend until smooth.
  3. Heat 1 tablespoon of sesame oil in a large cast iron skillet (or nonstick skillet) over medium heat. Once hot and shining, add tofu. Cook tofu, turning occasionally, until all sides are lightly brown. This will probably take about 10 minutes. At this point add about 1 tablespoon of the sauce, 1 tablespoon of water, and 1/2 tablespoon of sesame oil to the pan. Stir or shake the pan around to coat the tofu in the sauce. Because the pan is hot, the added sauce/water/oil should pretty much immediately sizzle and coat the tofu as you stir it around. Transfer the tofu to a bowl and set aside.
  4. Heat the remaining 1/2 tablespoon sesame oil in the skillet over medium heat. Once heated, add noodles, bean sprouts, and remaining black pepper sauce. Use tongs to help move the noodles and bean sprouts around so they are all getting coated in sauce. Cook, stirring frequently (you want to avoid the noodles/sprouts sticking to the bottom of the pan), for about 5-10 minutes until noodles and sprouts are cooked through and soft. Add small amounts of water as necessary to help everything cook and to keep it from sticking to the bottom of the pan. Remove from heat.
  5. Add the spinach leaves and cooked tofu and stir to combine. The spinach leaves should wilt pretty quickly from the heat of the noodles.
  6. Serve topped with sesame seeds.
recipe adapted from Pinch of Yum

Black Pepper Stir Fried Noodles

Tuesday, April 29, 2014

Chicken [or Tempeh] and Broccoli Curry with Coconut Rice

Chicken [or Tempeh] and Broccoli Curry

I recently celebrated my 29th birthday! Mark jokingly said "I guess this will be the first of many 29th birthdays".  Ha! I think I'll be okay with proceeding into my 30s, but let's not rush anything!

For my birthday dinner I decided I wanted this yummy broccoli tempeh curry that I had made before but for some reason never posted to the blog. I KNOW I bought the tempeh at the store, but when it came time for us to cook this meal we couldn't find it anywhere! And I mean anywhere. We both searched the refrigerator, then the freezer, then all the cupboards, then the shopping bags, then even my car... nowhere to be found. So we decided it never made it home from the grocery store. Luckily I had some chicken in the freezer so I decided to just substitute the tempeh with chicken. Still tasted great! So moral of the story is this recipe works well with chicken or with tempeh!

Chicken [or Tempeh] and Broccoli Curry

This meal consists of coconut rice topped with chicken and broccoli tossed in a delicious (and pretty healthy) homemade tomato/coconut curry sauce. The sauce is relatively quick to make and I found that overall there was less chopping of ingredients than in some recipes. Had we not spent 15 minutes looking for the tempeh, it would have been ready quickly! Just start cooking your rice first and everything else will be done when the rice is done.

I have a rice cooker and just threw the broccoli in the top of the rice cooker to steam while I cooked the chicken. I forgot to set a timer so I overcooked the broccoli a bit. It still tasted great, but it's better when the broccoli holds its shape better.

I really like the flavors of this dish. If you make it, I definitely encourage you to make the rice as well! I used black rice (I found it in bulk at Costco and we are loving it), but brown rice works too.


Chicken [or Tempeh] and Broccoli Curry

Chicken [or Tempeh] and Broccoli Curry with Coconut Rice

serves: 4

INGREDIENTS:
Coconut Rice
  • 1 cup black rice (or long grain brown rice)
  • 1 cup canned lite coconut milk
  • 1 cup water
  • 1 tablespoon coconut oil
Chicken [or Tempeh] and Broccoli Curry
  • 2-3 bunches broccoli, cut into florets
  • 2 tablespoons olive oil, divided
  • 8 ounces tempeh, cubed OR 1 pound boneless, skinless chicken breasts, cut into bite-size pieces
  • 1 tablespoon butter
  • 1 yellow onion, chopped
  • 1/4 teaspoon cumin
  • 1 1/2 teaspoons curry powder
  • 1/4 teaspoon turmeric
  • 1/4 teaspoon cayenne
  • 1/2 to 1 teaspoon salt (depending on if your tomatoes are unsalted)
  • 1 14.5 ounce can diced tomatoes (don't drain)
  • 1/2 cup water
  • 1/4 cup (or more as desired) lite coconut milk (use the same can that you used for the rice)

DIRECTIONS:
  1. Start by cooking the rice.  Combine all the rice ingredients in a small saucepan (or rice cooker). Bring to a boil, then reduce heat, cover, and simmer for 25-35 minutes until liquid is absorbed. Remove from heat and let rice sit, covered, at least 10 minutes until ready to serve.
  2. Meanwhile, steam or saute broccoli until tender (don't overcook!). Run under cold water to stop the cooking and set aside.
  3. Heat 1 tablespoon olive oil in a large skillet over medium heat. Add tempeh or chicken and cook, stirring occasionally, until cooked through and lightly browned. Remove from pan to a plate and set aside.
  4. Add remaining olive oil and butter to the skillet and turn heat to low. Once butter is melted, add onions and cook until soft and slightly brown, about 5 minutes.
  5. Add cumin, curry powder, turmeric, and cayenne. Stir to combine.
  6. Add in salt, tomatoes, and water. Stir to combine and cook for about 2 minutes.
  7. Transfer onion/tomato mixer to blender. Add 1/4 cup lite coconut milk to blender as well. Blend until thoroughly pureed. Add more coconut milk until desired taste/consistency is reached.
  8. Return pureed curry sauce to skillet. Add chicken/tempeh and stir to combine. Cook over medium-low heat for about 5 minutes until chicken/tempeh is hot. 
  9. Add broccoli and stir to combine. Cook until broccoli is warmed through. 
  10. Remove from heat and serve over coconut rice.
recipe slightly adapted from edible perspective

Tuesday, April 22, 2014

Thai Peanut Noodle and Veggie Bowl

Thai Peanut Noodle and Veggie Bowl

Have you been enjoying spring? After lots of snowy months is always exciting to feel the warmth of the sun again. With some warmer days last week I started craving salads again. This Thai noodle bowl with lots of vegetables and a delicious peanut sauce was a great way to satisfying that craving.

My love of peanut butter and Thai flavors is not new to this blog, and I've made similar recipes before (vegetables + some other ingredient + peanut sauce). What makes this different is the addition of cold noodles and lots of edamame, which really help to make this a full dinner that is quite satisfying. Bonus? This meal is very quick to make. Start boiling water for your noodles and prep everything else while the water comes to a boil and the noodles cook. Then it's time to eat!

Thai Peanut Noodle and Veggie Bowl

I found this recipe on a blog I just recently discovered, Oh My Veggies. It is run by a few different people but features all vegetarian recipes. It also has meal plans like I used to do! I've been enjoying looking at everything on that site so expect to see more recipes from that source in the future. This particular Thai noodle bowl recipe was originally from the Oh She Glows Cookbook. Oh She Glows is another blog that's been one of my favorites for a few years.

I will definitely be making this again during the warmer months. It would make a great lunch as well! Enjoy!

Thai Peanut Noodle and Veggie Bowl

serves: 4

Recipe: Thai Peanut Noodle and Veggie Bowl

Kaitlyn's Notes:

  • I couldn't find soba noodles, so I used whole wheat linguine instead.
  • I doubled the amount of pasta (I used 8 ounces) to make larger dinner servings.
  • I made 1.5 times the sauce, since I doubled the pasta. I recommend doing that if you also double the pasta and tend to like a lot of dressing on salads, otherwise it's probably not necessary.
  • Baked tofu or chicken would make a great addition or substitute for some of the edamame.
Thai Peanut Noodle and Veggie Bowl

Wednesday, March 26, 2014

Skillet Pasta with Sausage and Vegetables

Skillet Pasta with Sausage and Vegetables

This recipe is one that I first made probably 7 years ago.  At that point I made it fairly regularly, but at some point I forgot about it and it got lost among my recipes.  I happened to think of it a few weeks ago and I'm so glad I did, because it's delicious!  Really!

Skillet Pasta with Sausage and Vegetables

The idea is you cook the pasta in broth/water in the skillet with the rest of the ingredients.  This means you only have one pan and the whole meal comes together quickly.  It also means that the pasta soaks up a ton of flavor.  The original recipe just called for spinach, but I added mushrooms and bell pepper.  You can certainly add or substitute any other vegetables you have on hand.

Skillet Pasta with Sausage and Vegetables

We don't have pasta often, but in the future when we have pasta this is definitely the way I'll make it.  So much better then pasta with jarred pasta sauce, and not that much more difficult.

Skillet Pasta with Sausage and Vegetables


Skillet Pasta with Sausage and Vegetables
serves: 4

INGREDIENTS:
  • 1 tablespoon olive oil
  • 1 pound pre-cooked chicken sausage (any variety), sliced
  • 10 ounces mushrooms, brushed clean and sliced
  • 1-2 bell peppers, sliced
  • 5 cloves garlic, minced
  • 3 cups low-sodium chicken broth
  • 3 cups water
  • 10 ounces pasta (such as small shells or penne)
  • 1/2 cup sun-dried tomatoes (I used ones that were not oil-packed but either is fine), chopped fine
  • 6 ounces baby spinach, roughly chopped
  • 1/2 cup grated Parmesan cheese
  • 1/4 cup walnuts, chopped

DIRECTIONS:
  1. Heat oil in a 12-inch nonstick or cast iron skillet over medium-high heat until shimmering.  Add sliced sausage, mushrooms, and bell peppers.  Cook until sausage is lightly browned and vegetables have released liquid, about 3-5 minutes.  Add garlic and cook for another minute.
  2. Add chicken broth, water, pasta, and sun-dried tomatoes to the skillet with the sausage and vegetables.  Increase heat to high and cook, stirring often, until  pasta is tender and liquid has thickened.  This will take about 15-20 minutes depending on your pasta.  Add more water or broth if you think it's getting too dry.
  3. Stir in the spinach, in batches if necessary, and cook about 2 minutes until wilted.  
  4. Remove skillet from heat.  Sprinkle with Parmesan cheese and walnuts.  Season with salt and pepper to taste.  Serve!
recipe adapted from Cooks Illustrated

Sunday, February 9, 2014

Black Bean and Quinoa Enchilada Bake

Black Bean and Quinoa Enchilada Bake

Black Bean and Quinoa Enchilada BakeAs much as I love Mexican food, I have never ordered enchiladas from a restaurant before.  Really, I don't have a good reason for this.  It's mostly just that I can't seem to choose anything besides a vegetarian burrito.  Ha!  But when I saw this post a few weeks ago and the author writing "promise me you will make it!" on the recipe, I knew I had to give it a try.

Black Bean and Quinoa Enchilada BakeThe results really were amazing.  Definitely an example of something that tastes way better than it looks!! Mark said many many times how good it was as he was eating it.  He didn't even want me to tell him what was in it because he said it tasted so good he didn't want the truth about whatever healthy things were in it to spoil that for him!  This enchilada bake has quinoa, veggies, black beans, homemade enchilada sauce, and Mexican cheese.  We topped it with avocado and ate it with baked tortilla chips.  The enchilada bake was great for dipping chips in!  While it isn't the healthiest thing you could eat, this is overall a pretty healthy meal.

Black Bean and Quinoa Enchilada Bake

I know I am not posting as frequently as I used to, but I will post great recipes that I find- I want to remember to make them again myself!  So trust me, this was really good.  I will be making it again very soon!

Black Bean and Quinoa Enchilada Bake

serves: 6 (generous servings!)


Kaitlyn's Notes:
  • As you can see by the links, I made my own enchilada sauce.  It was very easy to do so I recommend that!  I made the full enchilada sauce recipe and used it all in the enchilada bake.
  • When I made this I actually made 2/3 of the quinoa, used less cheese (probably 1 cup) and baked in an 8x8 pan to serve 4.  These were big servings, but we devoured it!

Monday, January 27, 2014

Roasted Veggie Quinoa Bowls with Peanut Sauce


Roasted Veggie Quinoa Bowls with Peanut Sauce

I saw this recipe on Annie's Eats a few weeks ago and immediately bookmarked it (peanut sauce? I'm sold!).  The original recipe calls for eggplant, but I haven't quite grown to like eggplant yet... so I used broccoli instead.  Both Mark and I were very impressed with the result.  The peanut sauce has a lot of flavor, and helped to make the dish quite filling.  For dinner we had it warm (since the quinoa had just cooked), but for lunch I had it cold and it was delicious that way.  If you are a peanut butter fan and looking for a new dinner or lunch option, I highly recommend this recipe!

Roasted Veggie Quinoa Bowls with Peanut Sauce


Roasted Veggie Quinoa Bowls with Peanut Sauce
serves: 4-6 (depending on if you eat this for lunch or dinner)

The recipe can be found here.

Kaitlyn's Notes:
  • The original recipe calls for eggplant, onion, snow peas, and bell peppers for the vegetables.  I used broccoli, bell peppers, onion, and snow peas and I increased the overall quantity of vegetables by about 50%.  Feel free to experiment with different vegetables!
  • The vegetables get drizzled in olive oil and roasted.  The peanut sauce also calls for olive oil.  I found the dish a bit too oily overall, so I would use only 1 1/2 tablespoons of olive oil in the sauce next time (and possibly add a bit of water to thin the sauce).  
  • I increased the peanut butter and garlic in the sauce a bit.... because I love peanut butter and garlic. :)

Wednesday, December 4, 2013

Breaded Tempeh with Spicy Tomato Sauce

Breaded Tempeh with Spicy Tomato Sauce

I made this yummy tempeh recipe a few weeks ago.  Mark said it was one of his favorite ways of having tempeh.  It's essentially chicken parmesan, except with tempeh instead of chicken.  Tempeh is breaded and cooked in a skillet.  Then it is topped with a spicy tomato sauce (or your favorite pasta sauce) and cheese.

If you've never had tempeh or need to please someone who doesn't usually eat tempeh, give this a try.  With all the breading/sauce/cheese, it's easy to forget that you are eating tempeh. :)

Breaded Tempeh with Spicy Tomato Sauce

Breaded Tempeh with Spicy Tomato Sauce

serves: 2

INGREDIENTS:
  • 1 8 ounce block of tempeh (any variety)
  • 3/4 cup panko breadcrumbs
  • 1 tablespoon dried oregano
  • 1/2 teaspoon dried parsley
  • 1/2 teaspoon garlic powder
  • 1/4 teaspoon salt
  • 1/2 cup whole wheat flour
  • 1 large egg whisked with 1 tablespoon of water
  • 2 tablespoons olive oil
  • tomato sauce (use spicy tomato sauce below or your favorite pasta sauce)
  • mozzarella cheese or other cheese of choice

DIRECTIONS:

1) Cut the tempeh in half lengthwise so it is half as thick.  Then, cut each half into 4 equal sections.

2) In a small bowl, combine breadcrumbs, oregano, parsley, garlic powder, and salt.  Put flour in another small bowl.  Put egg whisked with water in a third bowl.

3) Heat olive oil in a large skillet over medium heat (I used a cast iron skillet).  While oil is heating, coat each piece of temepeh in the flour, then the egg wash, then the breadcrumb mixture.  Use your fingers to make sure the tempeh is fully coated with the breadcrumbs.  You might not end up using all of the breadcrumbs.

4) When olive oil is hot, add temepeh to the pan in a single layer.  Cook for about 5 minutes until golden brown.  Then carefully flip each piece and cook on the other side for another 3-5 minutes.

5) Serve topped with tomato sauce and cheese with roasted vegetables on the side.

recipe slightly adapted from edible perspective


Spicy Tomato Sauce

INGREDIENTS:
  • 1  tablespoon olive oil
  • 6 cloves garlic, minced
  • 1  teaspoon red pepper flakes
  • 1 28 ounce can crushed tomatoes
  • 1/ 4 teaspoon salt
  • 1 teaspoon oregano
  • 1 teaspoon lemon juice

DIRECTIONS:
Combine oil, garlic and red pepper flakes in a small pot over medium-high heat.  Once it starts to sizzle, add crushed tomatoes, salt, and oregano.  Stir to combine.  Reduce heat to medium-low and cover.  Cook, stirring occasionally, for about 5-10 minutes.  Remove from heat and stir in lemon juice.  Set aside until ready to use.  Store leftovers in the refrigerator or freezer.

Tuesday, October 29, 2013

Potato and Winter Squash Gratin

Potato and Winter Squash Gratin

The other day I was in the mood for a new fall recipe, and happened upon a recipe for potato, squash, and goat cheese gratin.  I was intrigued by the goat cheese and the inclusion of squash in what is typically a heavy potato dish.  The recipe called for yellow squash and that was my original plan, but then I saw some small delicata squashes at the grocery store and thought they might be more fitting for fall.  They worked out great!  This dish is super comforting and delicious, but doesn't have loads of cheese or heavy cream.

Essentially you slice squash and potatoes very thinly.  Toss with olive oil and layer into a baking dish with crumbled goat cheese, salt, and pepper.  Top with some parmesan cheese and a little milk and bake for an hour.  If you have a mandoline then you can use that to slice the squash and potatoes and this comes together very quickly.  I don't have a mandoline, so I had to spend a good amount of time slicing everything thinly by hand.  Because my slices weren't quite as thin as a mandoline would have made them, and because delicata squash is denser than yellow squash, I increased the baking time by about 20 minutes.

If you would also like to try this with delicata squash, I recommend cutting it in half lengthwise and scooping out the seeds.  Then, thinly slice so you have semi-circular pieces.  Of course I'm sure the yellow squash would also be good.  You could also mix up the potatoes to include some sweet potatoes as well.

I think this would be a great dish for Thanksgiving or another fall party.  For our dinner, I served it with a piece of salmon for some protein.  I'm already looking forward to the leftovers!

Potato and Winter Squash Gratin


Potato and Winter Squash Gratin

serves: 4

The recipe can be found here.

Kaitlyn's Notes:

  • If you want this for a substantial part of your meal, double the recipe to serve 4.  I used 1 1/2 pounds of red potatoes and 1 1/2 pounds sliced delicata squash.
  • You can cut back the olive oil to two tablespoons (for the original recipe) and it will still be great.
  • Substitute delicata squash for the yellow squash and/or sweet potato for the regular potatoes depending on what you feel like.  If you use denser vegetables, plan to increase the baking time by about 20 minutes.
  • Everything should be sliced as THINLY as possible.  You can leave the skins on.

Monday, October 14, 2013

Salad Topped Pizza

Salad Topped Pizza

I recently got a chance to try salad topped pizza as inspired by the King Arthur Flour blog.  It turned out well and tasted great, but Mark and I agree that this would be best as an appetizer or perhaps as part of a bigger pizza party where there were lots of different types of pizzas.  As a main course, we'd prefer one of our other favorite pizzas.

I still wanted to share it here though because I think it is a fun idea!  It's essentially like having a salad and bread all in one.  And with way less cheese on this than a traditional pizza, it's much healthier.

If you do make this, the best way to reheat is in a skillet or on a griddle.  This heats and re-crisps the crust without cooking the toppings.

Salad Topped Pizza

Salad Topped Pizza

I'm not going to post a recipe here because this is really more of an idea than a recipe.  You can top the pizza with whatever salad ingredients you like!  My general method was:
  1. Make pizza dough and form crust
  2. Bake pizza crust for 10 minutes at 450F
  3. Top pizza with 1 cup of ranch style dressing, return to oven for 2 minutes
  4. Top pizza with salad ingredients, return to oven for 1 minute
  5. Sprinkle with asiago cheese
  6. Slice and serve!
Here is the original full recipe:  Greens and Grains Pizza

If you need a faster pizza crust option, you could always buy pre-made dough or a pre-made crust, or try this recipe: Pizza Crust

I made a ranch type dressing out of greek yogurt and spices [dill, salt, pepper, basil, garlic powder, red pepper flakes, beau monde seasoning] that was vaguely inspired by this recipe and the homemade ranch spice mix recipe link: Greek Yogurt Ranch Dressing

Salad Topped Pizza

Monday, October 7, 2013

Indian Style Tofu and Bean Sprouts

Indian Style Tofu and Bean Sprouts

I enjoy tofu as a protein source for dinner every couple of weeks.  I already have two favorite tofu recipes, but I always keep my eye out for others.  One of the great things about tofu is that you can cook it FAST and you don't have to worry about dealing with raw meat.

This particular recipe stood out for a couple of reasons:
  • not many ingredients and not much ingredient preparation 
  • uses bean sprouts which Mark particularly likes (I like them too!)
  • different from my typical tofu recipes because it's not spicy
Mark and I love spicy food, but not everyone does, so it's nice to have a good tofu suggestion for those of you out there who are not spicy fans!  This tofu dish has a pleasant mild coconut flavor.  When cooked, the bean sprouts to me taste like noodles.  I served this over brown rice but that really isn't necessary.  This would be great plain with more vegetables on the side.  The original recipe had a few ingredients that I did not have and did not feel like venturing out to find, so I had to modify the recipe to include more standard spices.   If you serve this without rice, you can get this meal together in under 30 minutes- perfect for a busy weeknight!

Indian Style Tofu and Bean Sprouts


Indian Style Tofu and Bean Sprouts

Serves: 4

INGREDIENTS:
  • 1 15-oz package extra firm tofu
  • 2 tablespoons coconut oil
  • 1/2 teaspoon ground mustard
  • 1/2 teaspoon ground cumin
  • 1/2 teaspoon dried basil
  • 1/2 teaspoon garlic powder
  • 1/2 teaspoon turmeric powder
  • 1 small jalapeno, seeded and minced (Note: the heat of a jalapeno comes from its seeds, so by taking out the seeds you are not adding very much heat at all to the dish.)
  • 12-16 ounces bean sprouts (my bag was 12 ounces)
  • 1 cup light coconut milk (from a can--- if you serve this with rice, I recommend using the rest of the coconut milk from the can as some of the cooking liquid for the rice)

DIRECTIONS:
1) Drain the tofu and press with towels to remove as much liquid as possible.  Cut into small cubes and set aside.

2) Heat oil in a large skillet over medium heat.  Once hot, add all spices and jalapeno.  Mix for about 30 seconds. 

3)  Add cubed tofu and mix so that the spices coat the tofu.  Cook the tofu, flipping occasionally, until it is lightly browned on most sides.  This should take about 10 minutes.

4)  Add the bean sprouts and coconut milk and stir to combine.  Cook for about 2 minutes until the bean sprouts are wilted and the coconut milk is mostly absorbed (you can cover your skillet for this if you have a cover).

5) Serve hot with cooked brown rice if desired.

(recipe adapted from Veggie Belly) 

Wednesday, September 25, 2013

Pizza Topped Quinoa + Bean Burgers

Pizza Topped Quinoa + Bean Burgers

These fun burgers are sort of like bagel pizzas except switch out the bagel for a quinoa bean burger.  Weird description?  Perhaps.  They really are just burgers made with beans, quinoa, and Italian flavors that are topped with your favorite pizza toppings.  Mark devoured three of these pretty quickly.  They are delicious! Our only complaint is that they don't hold together very well when you are eating them, so you really do need to eat them with a fork.  I found this recipe over at edible perspective, and she ate these on a piece of bread so that is an option as well.  I opted to skip the bread since the quinoa felt like enough carbs.

Pizza Topped Quinoa + Bean Burgers

I topped these with a spicy homemade tomato sauce, sauteed mushrooms, black olives, and mozzarella cheese.  Of course you could top them with whatever pizza toppings sound good to you.  And don't let the long ingredient list scare you- I've included my recipe for my pizza sauce, but you don't have to use that!  I served these with roasted kale, because Mark and I both LOVE kale, but I recommend serving these with your vegetables of choice.  These pizza burgers really are a great way to satisfy your pizza cravings in a different (and healthy!) way.  As the weather continues to get cooler and warm comfort foods sound like the perfect dinner, give these a try!

Pizza Topped Quinoa + Bean Burgers

Pizza Topped Quinoa + Bean Burgers 

yield: 8 burgers (serves 4 or more, depending on how and with what they are served)

INGREDIENTS:
Burgers:
  • 1/2 cup dry quinoa
  • 1 14 oz can cannellini beans, rinsed and drained
  • 1/2 cup finely chopped onion
  • 3 tablespoons finely chopped basil
  • 1 teaspoon dried oregano
  • 4 cloves garlic, minced
  • 1/2 teaspoon salt
  • 1/2 teaspoon pepper
  • 1/2 teaspoon crushed red pepper flakes (optional)
  • 2 tablespoons olive oil
  • 1 large egg + 1 egg white (or 1 duck egg), whisked
  • 6 tablespoons ground rolled oats (You can grind them in your food processor.  Use gluten-free if desired.  Or try substituting a different type of flour)
  • olive oil for cooking
Spicy Tomato Sauce (or use your favorite pizza sauce):
  • 1 tablespoon olive oil
  • 4 cloves garlic, minced
  • 1/4 teaspoon (or more) crushed red pepper flakes
  • 1 28 ounce can diced tomatoes (no salt added if possible), juice drained out
  • 1/4 teaspoon salt
  • 1 teaspoon dried oregano
Toppings:
  • 10 ounces mushrooms, sliced
  • black olives, sliced
  • mozzarella cheese
  • parmesan cheese

DIRECTIONS:
1) Start by cooking the quinoa.  Combine dry quinoa and 1 cup of water in a small pot.  Set over medium high heat and bring water to a boil.  Once boiling, reduce hit to low and cover the pot.  Let cook for 15 minutes (while you prep other ingredients), until all water is absorbed.  Set quinoa aside to cool slightly.

2) Next start the spicy tomato sauce.  Puree the diced tomatoes (without the juice) in a blender, food processor, or with an immersion blender.  Heat olive oil in a small pot with garlic and red pepper flakes over medium heat.  Once garlic begins to brown, add tomatoes, salt, and oregano.  Stir to combine.  Cover and cook on low/medium-low until ready to use.

3) Process beans in a food processor, or mash thoroughly with a fork.  In a large bowl, combine beans, cooked quinoa, onion, basil, oregano, garlic, salt, pepper, and crushed red pepper flakes.  Add olive oil and eggs and mix.  Add ground rolled oats and mix to combine.  The mixture should be wet, but you should be able to form it into balls that stay together.  If it's too wet, add a couple tablespoons more ground oats (or flour).

4) Divide burger mixture into 8 equal portions and shape into burgers that are about 3/4 inch thick.

5) Heat about 2 teaspoons of olive oil in a large skillet over medium heat.  Once hot, use a spatula to carefully transfer half of the burgers to the skillet.  Cook for five minutes until dark brown on the bottom.  Carefully flip over and cook for another five minutes until browned and cooked through.  If burgers are browning too quickly and not cooking on the inside, lower the heat! Repeat with remaining burgers.  Preheat your oven to low broil in the last few minutes of cooking.

6)  While burgers are cooking, heat a small amount of olive oil in a medium skillet.  Add mushrooms and cook, stirring frequently, until liquid is released and evaporated.  Set aside.

7) Place burgers on a baking sheet.  Top each burger with spicy tomato sauce, mushrooms,  olives, and a sprinkle of mozzarella cheese and Parmesan cheese.  Place in the oven under the broiler for 2-4 minutes until cheese is starting to brown (watch carefully!!).  Enjoy!

(recipe slightly adapted from edible perspective)

Wednesday, September 18, 2013

Lemon Garlic Salmon

Lemon Garlic Salmon

If you've never made salmon before, this is a good recipe to start with.  It is quick, but full of lots of flavor.  Minced garlic, lemon zest, salt, and pepper are sprinkled on top of salmon before it is sauteed in a skillet.  I've made this many times in the past couple of years, but kept forgetting to actually take a picture for the blog!  It was actually Mark who first introduced me to cooking salmon.  He used to load it up with lots of lemon pepper before cooking it, and over time I've modified his version to this version.  We're both big fans of garlic, so the addition of garlic was not a hard sell. :)

Lemon Garlic Salmon

This time I served the salmon with roasted kale and mushrooms, but I often use whatever vegetables sound good on the side.  You can also serve this with rice/bulgar/quinoa/bread if you are in the mood for carbs as well.  Recently I've been trying to have the majority of my plate be vegetables plus some protein and not focusing on the carbs.

Lemon Garlic Salmon

Once you try this salmon recipe, I bet it will quickly become part of your regular rotation for fast weeknight dinners!

Lemon Garlic Salmon

serves: 4

INGREDIENTS:
  • 1 tablespoon olive oil
  • 4 4-6 oz salmon fillets (I buy them frozen and skinless-- if yours are frozen then defrost before using in the recipe)
  • 5 large cloves garlic, minced
  • 1 lemon
  • salt + pepper

DIRECTIONS:
1) Heat olive oil in a large skillet over medium heat.

2) Zest the lemon and then juice the lemon, saving the juice in a small bowl.  Set the lemon juice aside.  Coat both sides of each salmon fillet with garlic and lemon zest.  Then, sprinkle both sides of each salmon fillet with salt and pepper (I used about 1/2 teaspoon of each total).  Note: If your salmon has skin, coat only the skinless side with garlic, lemon zest, salt, and pepper.
Lemon Garlic Salmon

3) Once your pan and olive oil are hot, add coated salmon fillets (Cook salmon in two batches if necessary).  Cook for about 2 minutes until the edges of the salmon start to look cooked.  Add lemon juice to the pan.  Flip each fillet and cook on the other side for about 3 more minutes until completely cooked.  The outsides of the fillets should be browned and the inside temperature should be 145F.  Note that the length of time necessary to cook the salmon will vary depending on how thick it is.

4) Serve immediately with roasted vegetables or a salad.

Thursday, August 1, 2013

Summer Vegetable Pasta Salad

Summer Vegetable Pasta Salad

This is a yummy pasta salad that I've made two times recently.  It's hearty enough for a main dish, and is a great way to eat lots of vegetables.  The dressing for this pasta salad is made with apple cider vinegar, olive oil, and lots of garlic and herbs.  It adds lots of delicious flavor to this simple dish.

I used a zucchini from our garden in this salad! I highly recommend using any produce from your garden for this salad.  And if you have fresh herbs in your garden, you should definitely use those for the dressing.  Last year my mother-in-law had some delicious lemon thyme in her garden that would go great with this (Lanie, if you have that again this year, definitely use it to make this!).

Summer Vegetable Pasta Salad

This is a great make-ahead salad, as the flavors develop even more over time.  I've found it's good cold, at room temperature, or even slightly warm.  I hope you get a chance to enjoy it before all the summer vegetables are gone!

Summer Vegetable Pasta Salad


Summer Vegetable Pasta Salad

serves: 4-6 as a main dish

INGREDIENTS:

For the dressing:
  • 6 tablespoons olive oil
  • 6 tablespoons apple cider vinegar
  • 4 cloves garlic, finely minced
  • 2 teaspoons honey
  • 1/2 teaspoon salt
  • 3/4 teaspoon black pepper
  • 1/2 teaspoon red pepper flakes (optional)
  • 1/4 cup chopped fresh herbs (I've used parsley, basil, thyme, oregano)

For the salad: *feel free to substitute different vegetables that you have!*
  • 10 ounces whole wheat penne pasta (or pasta of choice-- I threw in some orzo I had as well)
  • 3-4 medium squash (yellow and/or green),  halved and sliced (to yield about 5 cups cut up squash)
  • 1 small bunch asparagus, ends trimmed and sliced into 1 inch segments
  • 1 cup frozen green peas
  • 1-2 cups cherry/grape tomatoes, halved
  • 1 can chickpeas, rinsed and drained 
  • optional: goat cheese or Parmesan cheese for topping

DIRECTIONS:
1) Combine all the dressing ingredients in a jar and shake well (or whisk together in a bowl).  Refrigerate until ready to use (the longer it sits, the more the flavors will combine and the better it will be).

2)  Bring water to a boil and cook pasta according to package directions.   *Save the cooking water!*

3)  While pasta is cooking, prep all the vegetables.  

4) Drain the pasta into a colander set inside a large pot (to save the cooking water).  Run cold water over the pasta to cool it down.  Bring the pot filled with cooking water to the stove and turn the heat on high.  Add the squash, asparagus, and frozen peas and cook for 2-4 minutes. You want the vegetables cooked, but still a bit crunchy- try not to overcook them!  Drain the vegetables and run cold water over them to stop the cooking and cool them down.

5) Combine pasta, cooked vegetables, tomatoes, and chickpeas in a large bowl.  Pour dressing over top and gently mix to combine.

6)  Serve topped with crumbled goat cheese or Parmesean cheese if desired (it's excellent either way).  Season with additional salt and pepper if desired.

(recipe barely adapted from edible perspective)

Wednesday, July 24, 2013

Jalapeno Cheddar Turkey Burgers

Jalapeno Cheddar Turkey Burgers

In my continuing quest for more recipes that don't require an oven, I came upon these turkey burgers.  They were originally actually chicken burgers (made with ground chicken), but I had ground turkey so that is what I used!  These were delicious topped with diced avocado and salsa (sort of like guacamole).  Mark liked them so much that he wanted the leftovers for breakfast the next morning.

Jalapeno Cheddar Turkey Burgers

Wondering what sort of weird "bun" these are served on?  I didn't have any hamburger buns on hand and I wasn't about to turn on my oven, so I continued my fun with grilling bread.  I rolled out some pizza dough from the freezer (again) so that it was fairly thick.  I grilled it on both sides and it completely puffed up- filling up with air like a balloon!

Huge Pita on the Grill

That was awesome.  And also meant that I had essentially made one huge pita.  So after removing the bread from the grill I cut it into four sections and split it open.  I now had four burger pockets.  While I would have served these with traditional burger buns if we had them, we both actually really liked these pockets.  They held the topping well so it was overall less messy.  Also, they didn't make the burger too tall to fit your mouth around.... so- a winner!  I'll definitely do this idea again for burgers.  If you're not up for making your own grilled bread (though it is super easy), you could always just buy pita bread at the store if you want to try eating these in that way.

A couple of notes about the burgers.  They were definitely spicy so you might want to use less jalapeno if that is not your thing.  Or just be careful about the salsa on top.  Also, there are no breadcrumbs in the burgers, so the burgers themselves are gluten-free!

However you eat these burgers, they are definitely a great use for your grill this summer.   [Speaking of summer, Mark says he misses winter... did he really grow up in California? ;) ]

Jalapeno Cheddar Turkey Burgers

Jalapeno Cheddar Turkey Burgers
*burgers by themselves are gluten-free

serves: 4

INGREDIENTS:
  • 1 to 1 1/2 pounds ground turkey (I used 1 1/4 pounds)
  • 1/2 cup finely diced yellow onion (about 1/2 a small yellow onion)
  • 1/3 cup finely chopped fresh cilantro
  • 3 cloves garlic, minced
  • 1 jalapeno, seeded and finely diced
  • 1 teaspoon ground cumin
  • 1 teaspoon chili powder
  • 1/3 cup shredded cheddar cheese
  • 1/2 teaspoon salt
  • 1/2 teaspoon ground black pepper
Suggestions For Topping/Serving:
  • burger buns/ pita bread/ etc.
  • cheddar cheese
  • diced avocado/ guacamole
  • salsa

DIRECTIONS:
1)  Heat your grill to medium-high heat.  Combine all burger ingredients in a large bowl and mix until combined (don't over-mix).  Form into 4 patties.

2)  Cook the patties on the grill about 4 minutes per side until the internal temperature of each is 165F.  In the last couple of minutes, top with additional shredded cheese if desired.

3)  Assemble burgers in buns/pita/grilled bread and top as desired.  Guacamole and salsa is delicious.

(recipe adapted from Annie's Eats, originally from What's Gaby Cooking?)

Wednesday, July 17, 2013

Grilled Vegetable Sandwiches

Grilled Vegetable Sandwiches

This is more of an idea than an exact recipe.  I provide the recipe for what I did below, but you can definitely play around with this!  After trying grilled pizza, I thought it would be fun to try making bread for sandwiches out of pizza dough cooked on the grill.  I ended up making taco-shaped sandwiches that were really delicious and also very filling.

Grilled Vegetable Sandwiches

I filled the sandwiches with grilled vegetables (zucchini, peppers, red onion, portobellos) and grilled tofu slabs.  I divided the pizza dough (a little less than a pound's worth) into four pieces and rolled each piece into a rectangle that I grilled.  I then spread one side of the grilled bread with kale pesto and goat cheese (this was key!) before filling with the grilled ingredients.  YUM!

Store grilled ingredients separately from the bread for leftovers.  Reheating in the toaster oven is ideal!

This was a fun new way to use the grill (I actually did all of the grilling this time!).  And while a bit messy to eat, these sandwiches were thoroughly enjoyed!  Get creative and make your own grilled veggie sandwiches!

Grilled Vegetable Sandwiches

Grilled Vegetable Sandwiches

serves: 4

INGREDIENTS:
  • 1 ball pizza dough (about 1 pound)
  • olive oil
  • salt + pepper
  • 1 14 ounce package extra firm tofu, drained and water pressed out, cut into 4 slabs
  • 1 red onion, sliced into semi-thick circles
  • 2 green bell peppers, sliced into large flat pieces
  • 2 small zucchini, sliced into long strips
  • 4 portobello mushrooms, stems removed
  • kale pesto
  • goat cheese

DIRECTIONS:

1)  Divide the pizza dough into four sections.  Roll each section into a rectangle shape.  Brush with olive oil and sprinkle with salt + pepper (if desired).  Set aside while you prep the remaining ingredients.

2)  Heat the grill to medium and cook.  Brush or spray tofu, onion, peppers, zucchini, and mushrooms lightly with olive oil.    Cook on the grill until tender and moisture has been released.

3)  Turn the heat on your grill to medium-low and start to grill the bread.  Flip the rectangles onto the hot grill so that the oiled side is touching the grill (I did two at a time-- depends on the size of your grill).  Close the top of the grill and let cook for 1-4 minutes until browned on the bottom.  Carefully flip over and cook the other side until done (1-2  minutes more).

4)  Spread  half of each piece of bread with pesto and spread the other half of each piece of bread with goat cheese.  Layer tofu and vegetables onto one half and fold other half of bread over (now it looks like a taco/wrap!).  Cut each sandwich in half.  Serve with napkins (it can get messy!).

Wednesday, July 10, 2013

Grilled Pizza with Spinach, Portobellos, and Sausage

Grilled Pizza with Spinach, Portobellos, and Sausage

I first heard about grilling pizza a few years ago, and couldn't understand how the dough wouldn't fall through the cracks on the grill.  I just couldn't wrap my mind around it!  But I finally decided to give grilled pizza a shot during one of the recent 90F+ days, and it worked super well and was delicious.  A special thanks to Mark, the resident grill expert, for implementing my plan for this meal. :)

Grilled Pizza with Spinach, Portobellos, and Sausage

You can definitely top with your favorite pizza toppings.  I went with sliced portobellos and sausage that Mark pre-grilled, as well as some spinach, onions, garlic, and cheese.  It's important to not over-do it with the toppings on grilled pizza.  I was able to get the cheese melted and the spinach slightly wilted, but nothing else really cooked once it was on the pizza.

We loved the grill marks on the crust and the fact that this cooks fast!  Get your grill ready and start grilling any toppings you want to grill while you prep everything else.  You'll be in pizza heaven before you know it.  We are excited to experiment with other toppings throughout the summer (pesto anyone?).

I also think that this will be a great method for making flatbread for sandwiches or to have alongside salads during the hot summer months when you don't want to turn on the oven.  Instead of topping with lots of pizza toppings, just sprinkle the cooked pizza crust with some spices and eat however you want!

If you would appreciate more pictures of the process, King Arthur Flour did a blog post on grilled pizza a few years ago that might be helpful.  

Grilled Pizza with Spinach, Portobellos, and Sausage


Grilled Pizza with Spinach, Portobellos, and Sausage

serves: 2-4 (depends on what you serve along with it-- salad is great!)

INGREDIENTS:
  • 1 ball of pizza dough  (mine was about a pound of dough)
  • olive oil
  • 3 portobello mushrooms
  • 2 links chicken sausage
  • 1 yellow onion, sliced
  • 10 cloves garlic, sliced
  • handful fresh baby spinach
  • 3 ounces mozzarella cheese, sliced or shredded
  • salt + pepper

DIRECTIONS:
1) Heat up your grill to a medium heat.  On a piece of parchment paper or a silcone baking mat, roll the pizza dough into a rough rectangle (consider the size of your grill....) and brush with olive oil.  Set aside.

2)  Grill the mushrooms, sausage, and onion until they are cooked to your liking.  Slice the mushrooms and sausage and set aside.

3)  Meanwhile, heat 1/2 tablespoon olive oil in a small skillet over medium-low heat.  Cook garlic until golden.

4)  Once all toppings are prepped, turn the heat on your grill to medium-low and start to grill the pizza.  Flip the pizza dough rectangle onto the hot grill so that the oiled side is touching the grill.  Close the top of the grill and let cook for 1-4 minutes until browned on the bottom.  Carefully flip the crust over and top with toppings.  Start with the garlic, then the cheese, then the spinach, and finally the mushrooms, sausage, and onions.  Close the grill and cook for a few more minutes until the cheese is melted and the bottom of the pizza is brown.

5)  Carefully remove the pizza from the grill.  Sprinkle with salt and/or pepper if desired.  Slice and enjoy!

Sunday, July 7, 2013

Pesto Salmon

Pesto Salmon

I recently had some leftover kale pesto, and thought it would make a great topping for some salmon we had in the freezer.  I cooked up the salmon in a skillet, then topped with the pesto and tomatoes for a quick meal.   The homemade pesto provides lots of flavor (I use a lot of garlic!), and the salmon is very filling.  We had this with some toasted bread and were completely satisfied.  This is a great summer meal-- quick, no need to turn on the oven, and very refreshing.  Make yourself some pesto and then give this a try!

Pesto Salmon

Pesto Salmon

Serves: 2 (double to serve 4)

INGREDIENTS:
  • 1 tablespoon olive oil
  • ~10 ounce salmon fillet (mine was frozen and skinless)
  • 2+ tablespoons of Parmesan cheese
  • salt + pepper
  • 1/4 cup (or more) of homemade pesto
  • 1 medium tomato, diced

DIRECTIONS:
1) Heat olive oil in a large cast iron skillet over medium heat.  Season both sides of salmon with salt and pepper, and rub with 2 tablespoons of Parmesan cheese.

2) Once olive oil is shimmering, add salmon.  Reduce heat to medium low, cover, and cook on both sides until internal temperature is at least 140F.  

3)  Turn off heat, top with a thick layer of pesto, cover, and cook another minute or two to warm the pesto.

4)  Divide salmon into 2 pieces and top each piece with diced tomato.  Sprinkle with additional Parmesan cheese if desired.  

(recipe inspired by Pinch of Yum)
Pin It button on image hover